
搜索到
2
篇与
的结果
-
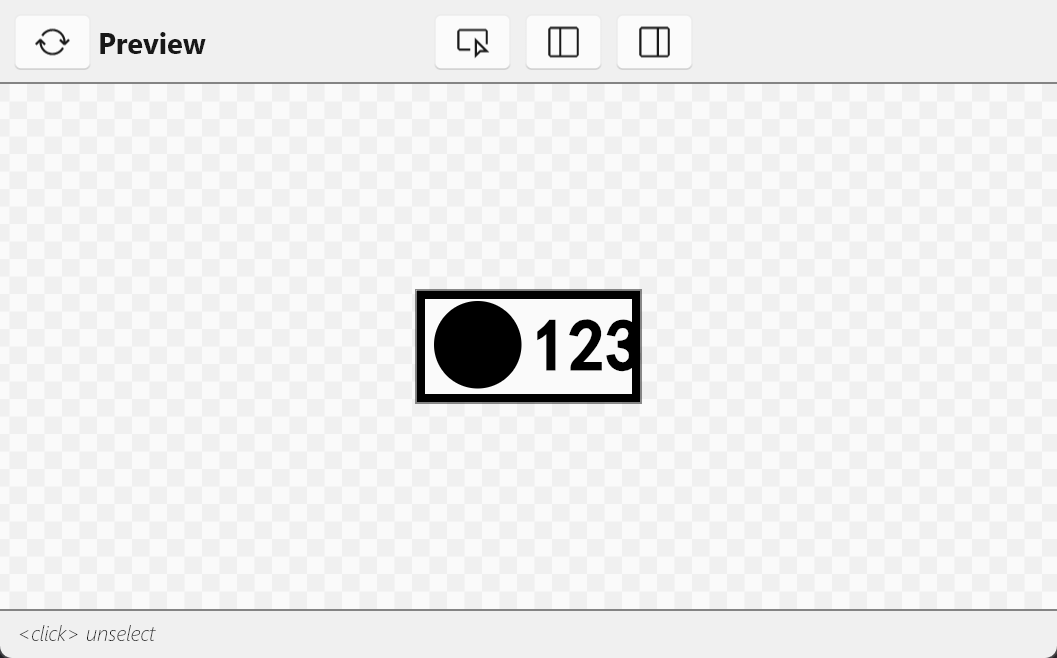
 ESP32C3使用Slint渲染OLED屏幕 前言:说一下为什么要用slint,既然都选择用rust开发嵌入式了避免不了要折腾,也是为后续驱动st7789做铺垫吧。而其实对应OLED屏幕已经有一个很好用的库了embedded-graphics,几乎能满足OLED屏幕的全部需求了,但是slint有动画,定时器,声明式,这些优势,再嵌入式开发再合适不过了。在写这个的时候也遇到不少坑,所以记录一下吧创建项目引入库编译问题已经在 ESP32C3引入Slint 文章解决了先创建一个最基础的esp32c3的项目然后再Cargo.toml中添加依赖# 基础依赖 critical-section = "1.2.0" esp-hal = { version = "1.0.0-beta.0", features = ["esp32c3","unstable"] } esp-alloc = "0.7.0" esp-println = { version = "0.13.1",features = ["esp32c3","log"] } log = "0.4.27" esp-backtrace = { version = "0.15.1" ,features = ["esp32c3","println","panic-handler"]} # 图形相关 embedded-hal = "0.2.7" embedded-graphics-core = "0.4.0" embedded-graphics = "0.8.1" embedded-graphics-framebuf = "0.5.0" ssd1306 = { version = "0.10.0" ,features = ["graphics"]} # 异步 esp-hal-embassy = { version = "0.7.0", features = ["esp32c3"] } embassy-time = { version = "0.4.0", features = ["generic-queue-8"] } embassy-executor = { version = "0.7.0",features = ["task-arena-size-20480"] } static_cell = { version = "2.1.0", features = ["nightly"] } [dependencies.slint] git = "https://github.com/slint-ui/slint" rev = "29168bc89270798f6075a0a729c14a3f011ceb4f" # 修复提交的哈希 default-features = false features = [ "compat-1-2", "unsafe-single-threaded", # 启用单线程模式 "libm", "renderer-software", ] [build-dependencies] slint-build = {git = "https://github.com/slint-ui/slint",rev = "29168bc89270798f6075a0a729c14a3f011ceb4f"} 配置Slint我们使用slint的ui跟代码分离的模式,修改build.rs新增一个build_slint函数,然后在main函数中调用它 fn main(){ build_slint(); ... } fn build_slint(){ slint_build::compile_with_config( "ui/MainView.slint", slint_build::CompilerConfiguration::new() .embed_resources(slint_build::EmbedResourcesKind::EmbedForSoftwareRenderer) ).unwrap() }创建UI文件在项目根目录下创建 ui/MainView.slint 文件,定义 UI 界面// 由于是在no_std的环境下,没有默认字体,使用需要引入自定义的字体 import "./fonts/simhei.ttf"; // 这里定义了一个全局的状态,用于在rust代码里进行修改ui状态 export global MyState { in-out property <bool> is_show : true; } export component MainView inherits Window { default-font-family: "黑体"; width: 128px; height: 64px; Rectangle { x:0px; y:0px; width: 100%; height: 100%; background: transparent; border-color: black; border-width: 5px; } Rectangle { x:10px; y:6px; width: 50px; height: 50px; background: black; border-radius: 360px; visible: MyState.is_show; } property <bool> is_show : false; Rectangle { x:80px; y:6px; width: 20px; height: 20px; background: black; visible: is_show; } // 使用了slint的ui的定时器 timer:=Timer{ interval: 0.5s; running: true; triggered => { is_show = !is_show; } } Text { font-family: "SimHei"; text: "12345"; color: black; font-weight: 900; font-size: 40px; x:66px; } }编写main.rs代码因为是使用的no_std,没有多线程,而slint的run方法会调用invoke_from_event_loop方法,进而导致阻塞线程,所以需要改造,不使用run方法来渲染,而是手动处理渲染,在实现traitPlatform时,不去重写invoke_from_event_loop函数,我们在初始化代码块去使用异步发方式实现 slint::include_modules!(); #[panic_handler] fn panic(info: &core::panic::PanicInfo) -> ! { loop { error!("panic:{}",info); } } #[esp_hal_embassy::main] async fn main(spawner: Spawner) -> ! { // generator version: 0.3.1 // init_logger_from_env(); init_logger(LevelFilter::Debug); esp_alloc::heap_allocator!(size: 100 * 1024); info!("分配内存完成"); let config = esp_hal::Config::default().with_cpu_clock(CpuClock::max()); let peripherals =esp_hal::init(config); // 配置异步 let timer0 = SystemTimer::new(peripherals.SYSTIMER); esp_hal_embassy::init(timer0.alarm0); let i2c = esp_hal::i2c::master::I2c::new(peripherals.I2C0, esp_hal::i2c::master::Config::default() .with_frequency(Rate::from_khz(400))) .unwrap() .with_sda(peripherals.GPIO8) .with_scl(peripherals.GPIO9); let display = Ssd1306::new( I2CDisplayInterface::new(i2c), DisplaySize128x64, DisplayRotation::Rotate0).into_buffered_graphics_mode(); info!("开启异步任务"); spawner.spawn(ui_run(display,spawner)).ok(); loop{ Timer::after_secs(2).await; } // for inspiration have a look at the examples at https://gitcahub.com/esp-rs/esp-hal/tree/esp-hal-v1.0.0-beta.0/examples/src/bin } #[embassy_executor::task] async fn ui_run(mut display: SSD,spawner: Spawner){ // 创建平台实例 let window = slint::platform::software_renderer::MinimalSoftwareWindow::new( slint::platform::software_renderer::RepaintBufferType::ReusedBuffer, ); window.set_size(PhysicalSize::new(128,64)); let platform = EspPlatform::new(window.clone()); slint::platform::set_platform(Box::new(platform)).unwrap(); // 创建ui let ui = MainView::new().unwrap(); ui.window().set_size(PhysicalSize::new(128,64)); let ui_weak = ui.as_weak(); spawner.spawn(ui_task(ui_weak)).ok(); info!("进入了loop run"); // 初始化显示 display.init().unwrap(); display.clear(BinaryColor::Off).unwrap(); display.flush().unwrap(); info!("清理屏幕 on"); // 创建行缓冲区 let display_width = 128; // 根据实际显示宽度设置 let mut the_frame_buffer = [Rgb565Pixel(0); 128 * 64]; // 128x64 // 这里是我们手动实现的invoke_from_event_loop loop { // 更新UI状态 slint::platform::update_timers_and_animations(); // 渲染UI window.draw_if_needed(|renderer| { info!("进入渲染回调"); renderer.render_by_line(FrameBuffer{ frame_buffer: &mut the_frame_buffer, stride: display_width,display:&mut display }); info!("退出渲染回调"); // 退出渲染回调,说明整个帧已经渲染完成,这时候刷新屏幕 display.flush().unwrap(); }); Timer::after_millis(100).await; } } #[embassy_executor::task] async fn ui_task(view:Weak<MainView>){ info!("ui_task 已经开启"); loop{ // 在这里用rust的代码更新slint的ui状态 let view = view.clone(); let view = view.upgrade().unwrap(); let show = view.global::<MyState>().get_is_show(); view.global::<MyState>().set_is_show(!show); info!("show的状态为:{}",show); Timer::after_secs(2).await; } } // 平台实现结构体 // 为了方便,先将OLED的屏幕生命周期设置为静态的 type SSD = Ssd1306<I2CInterface<I2c<'static,Blocking>>,DisplaySize128x64,BufferedGraphicsMode<DisplaySize128x64>>; struct EspPlatform{ window: Rc<slint::platform::software_renderer::MinimalSoftwareWindow>, } impl EspPlatform { fn new(window:Rc<MinimalSoftwareWindow>) -> Self { Self { window } } } /// 实现 Platform trait impl Platform for EspPlatform { fn create_window_adapter(&self) -> Result<Rc<dyn WindowAdapter>, PlatformError> { info!("成功创建了window"); Ok(self.window.clone()) } fn duration_since_start(&self) -> core::time::Duration { let time = Instant::now().duration_since_epoch().as_millis(); // info!("time :{}",time); core::time::Duration::from_millis( time ) } } struct FrameBuffer<'a>{ frame_buffer: &'a mut [Rgb565Pixel], stride: usize,display:&'a mut SSD } impl<'a> LineBufferProvider for FrameBuffer<'a> { type TargetPixel = Rgb565Pixel; fn process_line( &mut self, line: usize, range: core::ops::Range<usize>, render_fn: impl FnOnce(&mut [Self::TargetPixel]), ) { let line_start = line * self.stride; let line_pixels = &mut self.frame_buffer[line_start..line_start + 128]; render_fn(&mut line_pixels[range.clone()]); // 规定黑色为亮,由于是在oled屏幕上渲染,只有亮或者不亮,为了方便我们规定一个颜色为亮色,其余的颜色都视为不亮,在ui页面也是,使用黑色作为渲染的区域 let black = Rgb565Pixel(0); for (x,row) in line_pixels.iter().enumerate(){ // 先将要更新的行的地方进行清屏 self.display.set_pixel(x as u32,line as u32,false); // 然后对应要渲染的像素点进行渲染 if row == &black{ self.display.set_pixel(x as u32, line as u32, true); } } } } 编译查看效果预览页面烧录的效果跟我们slint编写的ui页面一致
 -
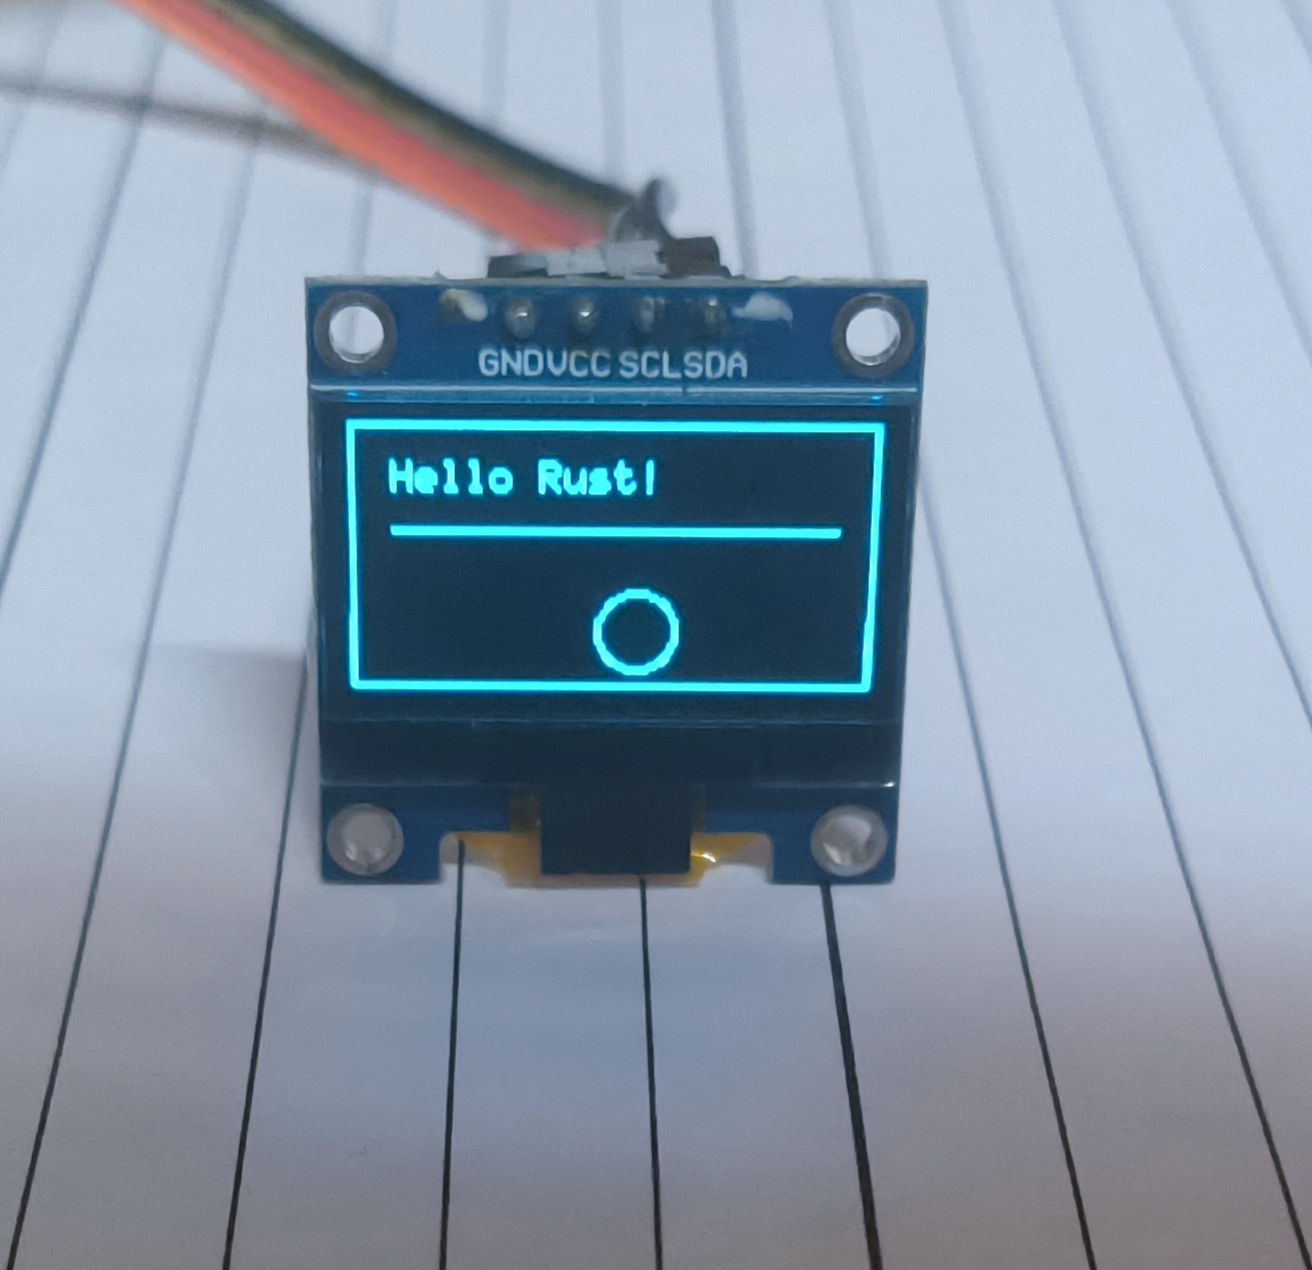
rust开发esp32c3驱动oled屏幕 使用的是 I2C SSD1306 0.96寸的OLED屏幕1.在Cargo.toml中添加图形库依赖# 处理ssd1306屏幕 ssd1306 = {version = "0.10.0",features = ["graphics"]} embedded-graphics = "0.8.1"完整配置 Cargo.toml[package] name = "esp32c3-oled-demo" version = "0.1.0" authors = ["suxii <m@suxii.cn>"] edition = "2021" resolver = "2" rust-version = "1.77" [[bin]] name = "esp32c3-oled-demo" harness = false # do not use the built in cargo test harness -> resolve rust-analyzer errors [features] default = [] experimental = ["esp-idf-svc/experimental"] [dependencies] log = "0.4" esp-idf-svc = { version = "0.51", features = ["critical-section", "embassy-time-driver", "embassy-sync","experimental","std"] } futures = "0.3.31" anyhow = "1.0.98" esp-idf-hal = "0.45.2" # 处理ssd1306屏幕 ssd1306 = {version = "0.10.0",features = ["graphics"]} embedded-graphics = "0.8.1" [build-dependencies] embuild = "0.33" 2.在main.rs中编写rust代码use esp_idf_hal::{ delay::FreeRtos, i2c::*, peripherals::Peripherals, prelude::*, }; use embedded_graphics::{ mono_font::{ascii::FONT_6X10, MonoTextStyle}, pixelcolor::BinaryColor, prelude::*, primitives::{Circle, Line, PrimitiveStyle, Rectangle}, text::Text }; use ssd1306::{I2CDisplayInterface, Ssd1306, prelude::*, size::DisplaySize128x64}; fn main() -> anyhow::Result<()> { esp_idf_hal::sys::link_patches(); // 初始化外设 let peripherals = Peripherals::take()?; // 配置I2C let i2c = peripherals.i2c0; let sda = peripherals.pins.gpio5; let scl = peripherals.pins.gpio6; let config = I2cConfig::new().baudrate(400.kHz().into()); let i2c = I2cDriver::new(i2c, sda, scl, &config)?; // 创建SSD1306接口 let interface = I2CDisplayInterface::new(i2c); let mut display = Ssd1306::new( interface, DisplaySize128x64, DisplayRotation::Rotate0 ).into_buffered_graphics_mode(); // 初始化显示屏 display.init().expect("SSD1306 init failed"); display.flush().expect("Failed to flush display"); // 创建图形样式 let text_style = MonoTextStyle::new(&FONT_6X10, BinaryColor::On); let line_style = PrimitiveStyle::with_stroke(BinaryColor::On, 1); let mut run_x = 64; loop { // 清空屏幕 display.clear(BinaryColor::Off).unwrap(); // 绘制边框 Rectangle::new(Point::new(0, 0), Size::new(128, 64)) .into_styled(line_style) .draw(&mut display).unwrap(); // 绘制文本 Text::new("Hello Rust!", Point::new(10, 15), text_style) .draw(&mut display).unwrap(); // 绘制直线 Line::new(Point::new(10, 25), Point::new(118, 25)) .into_styled(line_style) .draw(&mut display).unwrap(); // 绘制圆形 if run_x > 128 { run_x = 0 } run_x+=10; Circle::new(Point::new(run_x, 40), 20) .into_styled(line_style) .draw(&mut display).unwrap(); // 更新显示 display.flush().expect("Failed to flush display"); // 间隔2秒 FreeRtos::delay_ms(2000); } }3.接线 SSD1306SDA -> io05SCL -> io06VCC -> 5vGND -> GND4.效果展示