
搜索到
96
篇与
的结果
-
Flutter模板方法模式在多Tab列表中的应用 项目背景与需求在Flutter开发中,我们经常遇到需要实现多Tab栏列表的场景,每个Tab具有相似的结构(下拉刷新、上拉加载、列表展示),但数据类型和UI展示各不相同。本文将介绍如何使用模板方法模式来优雅地解决这个问题。模板方法模式简介模板方法模式是一种行为设计模式,它在超类中定义了一个算法的框架,允许子类在不修改结构的情况下重写特定步骤。在我们的场景中,每个Tab的加载流程(初始化→刷新→加载更多)是相同的,但具体的数据加载和UI展示是不同的。代码实现解析1. 抽象基类定义const int defaultPageSize = 10; abstract class TabData<T> { final String name; // tab名称 int total; // 数据数量 bool isSelected; // 选中状态 bool hasMore; // 是否有更多数据 List<T> items; // 数据列表 bool _isInited = false; // 是否初始化完成 final RefreshController controller; final Widget Function(BuildContext context,T item) itemBuilder; TabData({ required this.name, required this.itemBuilder, this.total = 0, this.isSelected = false, this.hasMore = true, this.items = const [] }) : controller = RefreshController(); int get pageSize => defaultPageSize; Future<List<T>> loadData(int page); void updateItems(List<T> newItems, bool isRefresh); Future<bool> init() async{ if (_isInited) { return true; } _isInited = true; await onRefresh(); return false; } Future<void> onRefresh() async { try { final data = await loadData(1); updateItems(data, true); hasMore = data.length >= pageSize; controller.refreshCompleted(); } catch (e) { controller.refreshFailed(); rethrow; } } Future<void> onLoadMore() async { if (!hasMore) { controller.loadNoData(); return; } try { final currentPage = (items.length / pageSize).ceil() + 1; final data = await loadData(currentPage); updateItems(data, false); hasMore = data.length >= pageSize; controller.loadComplete(); } catch (e) { controller.refreshFailed(); rethrow; } } void dispose() { controller.dispose(); } }设计要点:定义了完整的生命周期方法(init、onRefresh、onLoadMore)使用泛型T支持不同的数据类型封装了刷新控制器和分页逻辑提供itemBuilder回调实现UI定制化2. 具体子类实现点赞Tab实现:class LikeTabData extends TabData<LikeTabDataEntity>{ LikeTabData():super(name: "点赞",itemBuilder: (context,item){ return Text(item.name); }); @override Future<List<LikeTabDataEntity>> loadData(int page) async{ await Future.delayed(const Duration(seconds: 1)); return List.generate(pageSize, (index)=> LikeTabDataEntity(name: "$name 数据 ${page * pageSize + index}")); } @override void updateItems(List<LikeTabDataEntity> newItems, bool isRefresh) { items = isRefresh ? newItems : [...items, ...newItems]; total = items.length; } }评论Tab实现:class CommentTabData extends TabData<CommentTabDataEntity>{ CommentTabData():super(name: "评论",itemBuilder: (context,item) { Widget text () => Text(item.text,style: const TextStyle(color: Colors.white)); return Container( margin: const EdgeInsets.all(8), padding: const EdgeInsets.all(10), decoration: BoxDecoration( color: Colors.blueAccent, borderRadius: BorderRadius.circular(8), ), child: text(), ); }); @override Future<List<CommentTabDataEntity>> loadData(int page) async{ await Future.delayed(const Duration(seconds: 1)); return List.generate(pageSize, (index)=> CommentTabDataEntity(text: "$name 数据 ${page * pageSize + index}")); } @override void updateItems(List<CommentTabDataEntity> newItems, bool isRefresh) { items = isRefresh ? newItems : [...items, ...newItems]; total = items.length; } }子类只需实现:loadData:具体的数据加载逻辑updateItems:数据合并策略itemBuilder:列表项UI构建3. 状态管理class DialogState extends BaseViewState { List<TabData> tabDataList = [ LikeTabData(), CommentTabData(), LikeTabData(), CommentTabData(), ]; }4. 逻辑控制器class DialogLogic extends BaseGetXLifeCycleController{ late final PageController tabController; final state = DialogState(); @override void onInit() { super.onInit(); tabController = PageController(); state.viewState = TYPE_LOAD; update(); state.tabDataList.first.init().then((_)=> update()); Future.delayed(const Duration(seconds: 1),(){ state.tabDataList.first.isSelected = true; state.viewState = TYPE_NORMAL; update(); }); } @override void onClose() { tabController.dispose(); for(final item in state.tabDataList) { item.dispose(); } super.onClose(); } void onTabChange(int index) async{ for(int i = 0; i < state.tabDataList.length; i++) { state.tabDataList[i].isSelected = index == i; } update(); final isInited = await state.tabDataList[index].init(); if(!isInited) update(); } void changeTab(int index,BuildContext context){ final screenWidth = MediaQuery.of(context).size.width; tabController.animateTo(index * screenWidth,duration: const Duration(milliseconds: 300), curve: Curves.easeInOut); } void onRefresh(Future<void> Function() refresh) async{ await refresh(); update(); } void onLoadMore(Future<void> Function() loadMore) async{ await loadMore(); update(); } }5. UI界面实现class Dialog extends BaseTitleBottomSheet with GetXControllerMixin<DialogLogic>{ Dialog({super.key}); final logic = Get.put(DialogLogic()); final state = Get.find<DialogLogic>().state; @override String getTitle() => "Dialog"; @override Widget buildContent() { return buildPartBaseView( state.viewState,context, _buildContentWidget() ); } Widget _buildContentWidget() { return Expanded( child: Column( children: [ SingleChildScrollView( child: Row( mainAxisAlignment: MainAxisAlignment.spaceEvenly, children: [ for(int i = 0;i<state.tabDataList.length;i++) GestureDetector(onTap: ()=> logic.changeTab(i,context),child: _buildTabWidget(state.tabDataList[i])) ], ), ), Expanded( child: PageView.builder( controller: logic.tabController, onPageChanged: logic.onTabChange, itemCount: state.tabDataList.length, itemBuilder: (_,index){ final data = state.tabDataList[index]; if(data.items.isEmpty){ return const Center(child: Text("无数据"),); } return _KeepAliveList( data, keepAlive: true, onLoading: ()=> logic.onLoadMore(data.onLoadMore), onRefresh: ()=> logic.onRefresh(data.onRefresh), controller: data.controller ); }, ), ), ], ), ); } Widget _buildTabWidget(TabData entity){ final noSelectedStyle = TextStyle(color: Colors.black,fontSize: 23.w); final selectedStyle = TextStyle(color: Colors.blueAccent,fontSize: 23.w); final style = entity.isSelected ? selectedStyle : noSelectedStyle; return Row( mainAxisSize: MainAxisSize.min, children: [ Text(entity.name,style: style), Text("(${entity.total})",style: style), ], ); } } class _KeepAliveList extends StatefulWidget { final TabData tabData; final bool keepAlive; final VoidCallback? onRefresh; final VoidCallback? onLoading; final RefreshController controller; const _KeepAliveList(this.tabData,{super.key,this.keepAlive = true,required this.controller,this.onRefresh,this.onLoading}); @override State<_KeepAliveList> createState() => _KeepAliveListState(); } class _KeepAliveListState extends State<_KeepAliveList> with AutomaticKeepAliveClientMixin{ @override Widget build(BuildContext context) { super.build(context); return SmartRefresher( controller: widget.controller, enablePullDown: true, enablePullUp: true, header: const ClassicHeader(), onRefresh: widget.onRefresh, onLoading: widget.onLoading, child: ListView.builder( itemCount: widget.tabData.items.length, itemBuilder: (context,index){ // 新版本dart可以使用switch匹配模式,可以穷举完全部密封类的子类 // 为了兼容只能使用if了 final tabData = widget.tabData; if(tabData is LikeTabData){ return tabData.itemBuilder(context,tabData.items[index]); }else if(tabData is CommentTabData){ return tabData.itemBuilder(context,tabData.items[index]); } throw "未知的TabData类型"; }, ), ); } @override bool get wantKeepAlive => widget.keepAlive; }设计优势1. 代码复用性公共的刷新、加载、分页逻辑在基类中实现新增Tab只需继承TabData并实现三个抽象方法2. 可维护性算法框架稳定,修改基类即可影响所有子类业务逻辑与UI展示分离3. 扩展性支持任意类型的列表数据可轻松添加新的Tab类型4. 一致性所有Tab保持相同的交互逻辑统一的错误处理和加载状态使用建议添加新Tab:只需创建新的TabData子类,实现loadData、updateItems和itemBuilder修改公共逻辑:在TabData基类中修改,所有子类自动生效自定义分页大小:在子类中重写pageSize getter特殊处理:子类可重写onRefresh或onLoadMore方法进行个性化处理总结通过模板方法模式,我们成功地将多Tab列表中的公共逻辑提取到基类中,同时保留了子类的灵活性。这种设计模式特别适用于具有相似流程但不同实现的场景,能够显著减少代码重复,提高项目的可维护性和扩展性。
-
Flutter 实现流式消息接收 我们通过 Dio 发起一个 ResponseType.stream 请求,消费后端逐字符返回的 HTTP 流。核心代码如下:void sendMessage() => Dio().get( "http://192.168.149.178:8080/stream/covert?url=${state.text}", options: Options(responseType: ResponseType.stream), cancelToken: CancelToken(), ).then((response) { final data = response.data; if (data is! ResponseBody) return; state.data = ""; update(); data.stream.listen((chunk) { final res = utf8.decoder.convert(chunk); state.data += res; update(); }); });UI 部分使用 Expanded + SingleChildScrollView 展示实时追加的文本:Column( children: [ TextField(controller: logic.text), TextButton(onPressed: logic.sendMessage, child: Text("发送消息")), Expanded( child: SelectionArea( child: SingleChildScrollView( child: Column( crossAxisAlignment: CrossAxisAlignment.start, children: [Text(state.data)], ), ), ), ), ], )后端使用 Spring WebFlux 将目标网页内容逐字符延迟返回:@GetMapping("/covert") public Flux<String> covert(@RequestParam String url) { return Mono.fromCallable(() -> { // 同步抓取网页内容(在非 Netty 线程执行) var request = new Request.Builder().url(url).build(); try (var resp = client.newCall(request).execute()) { return resp.body().string(); } }) .flux() .flatMap(text -> Flux.fromStream(text.chars().mapToObj(c -> String.valueOf((char) c))) .delayElements(Duration.ofMillis(10)) // 每字符间隔 10ms ); }该方案无需 SSE 或 WebSocket,仅依赖标准 HTTP 分块传输,即可实现“打字机式”流式响应,适用于 AI 对话、实时日志等场景。
-
Flutter LayoutBuilder 原理深度解析 引言在 Flutter 响应式布局体系中,LayoutBuilder 是一个强大而特殊的组件。与大多数在构建阶段(build phase)确定其子树的组件不同,LayoutBuilder 将子组件的构建推迟到布局阶段(layout phase),从而能够根据父级传递的实际布局约束动态构建 UI。本文将深入源码层面,全面剖析 LayoutBuilder 的工作原理。核心架构概览类继承层次Widget ├── RenderObjectWidget │ └── ConstrainedLayoutBuilder<BoxConstraints> │ └── LayoutBuilder (具体实现)主要角色分工ConstrainedLayoutBuilder<T> - 抽象基类,定义约束构建器的通用协议LayoutBuilder - 面向 BoxConstraints 的具体实现_LayoutBuilderElement - 连接 Widget 与 RenderObject 的桥梁_RenderLayoutBuilder - 实际执行布局的 RenderObject源码深度解析1. Element 的初始化与绑定// _LayoutBuilderElement.mount 方法 @override void mount(Element? parent, Object? newSlot) { super.mount(parent, newSlot); // 1. 创建对应的 RenderObject renderObject.updateCallback(_rebuildWithConstraints); // 2. 绑定重建回调 }关键点分析:super.mount() 会创建 _RenderLayoutBuilder 实例updateCallback 将 _rebuildWithConstraints 方法注册到 RenderObject此时回调并未立即执行,只是建立了调用关系2. 布局阶段的核心调用链// _RenderLayoutBuilder.performLayout 方法 @override void performLayout() { final BoxConstraints constraints = this.constraints; // 1. 获取父级约束 rebuildIfNecessary(); // 2. 触发约束重建 if (child != null) { child!.layout(constraints, parentUsesSize: true); // 3. 布局子节点 size = constraints.constrain(child!.size); // 4. 确定自身大小 } else { size = constraints.biggest; } }2.1 约束的来源追踪约束的传递遵循 Flutter 渲染管线的标准流程:// RenderObject 层级传递 void layout(Constraints constraints, { bool parentUsesSize = false }) { this.constraints = constraints; // 父组件传递约束 // ... 后续布局计算 }this.constraints 在 performLayout 中通过 this.constraints 访问,这是 RenderObject 的标准属性。2.2 重建触发机制// RenderConstrainedLayoutBuilder 混入类 void rebuildIfNecessary() { assert(_callback != null); invokeLayoutCallback(_callback!); // 调用注册的回调 } // RenderObject 中的回调执行 void invokeLayoutCallback<T extends Constraints>(LayoutCallback<T> callback) { owner!._enableMutationsToDirtySubtrees(() { callback(constraints as T); // 关键:传递当前约束 }); }3. 安全的回调执行环境_enableMutationsToDirtySubtrees 是保证布局阶段安全修改组件树的关键:void _enableMutationsToDirtySubtrees(VoidCallback callback) { assert(_debugDoingLayout); bool? oldState; assert(() { oldState = _debugAllowMutationsToDirtySubtrees; _debugAllowMutationsToDirtySubtrees = true; // 临时允许修改 return true; }()); try { callback(); // 执行 LayoutBuilder 的 builder } finally { _shouldMergeDirtyNodes = true; assert(() { _debugAllowMutationsToDirtySubtrees = oldState!; // 恢复原状态 return true; }()); } }安全机制解析:断言保护:仅在布局阶段允许此操作状态切换:临时开启脏子树修改权限异常安全:使用 try-finally 确保状态恢复操作合并:设置 _shouldMergeDirtyNodes 以优化更新4. 约束重建的实际执行void _rebuildWithConstraints(ConstraintType constraints) { // 构建子组件的闭包 void updateChildCallback() { Widget built = widget.builder(this, constraints); // 调用用户定义的builder _child = updateChild(_child, built, null); // 更新子Element _needsBuild = false; _previousConstraints = constraints; // 缓存约束 } // 条件性执行重建 final VoidCallback? callback = _needsBuild || (constraints != _previousConstraints) ? updateChildCallback : null; owner!.buildScope(this, callback); }智能优化机制:_previousConstraints 缓存上次的约束仅当约束变化或标记需要重建时才执行避免不必要的重建,提升性能5. 更新与重建调度5.1 组件更新处理@override void update(ConstrainedLayoutBuilder<ConstraintType> newWidget) { super.update(newWidget); renderObject.updateCallback(_rebuildWithConstraints); // 重新绑定 if (newWidget.updateShouldRebuild(oldWidget)) { _needsBuild = true; // 标记需要重建 renderObject.markNeedsLayout(); // 触发重新布局 } }5.2 智能调度策略void _scheduleRebuild() { // 根据调度阶段决定立即标记还是延迟 final bool deferMarkNeedsLayout = switch (SchedulerBinding.instance.schedulerPhase) { SchedulerPhase.idle || SchedulerPhase.postFrameCallbacks => true, _ => false, }; if (!deferMarkNeedsLayout) { renderObject.markNeedsLayout(); } else { // 在稳定阶段延迟调度 SchedulerBinding.instance.scheduleFrameCallback(_frameCallback); } }调度策略优势:立即响应:在布局/绘制阶段立即触发更新延迟优化:在空闲阶段延迟到下一帧,避免打断当前操作设计模式分析1. 延迟决策模式LayoutBuilder 实现了典型的延迟决策模式:构建阶段:只建立结构和回调关系布局阶段:根据实际约束做出具体构建决策优势:适应动态布局需求,支持响应式设计2. 回调注册模式通过 updateCallback 机制实现松耦合:Element 向 RenderObject 注册回调RenderObject 在适当时机触发回调分离了决策逻辑与执行时机3. 安全沙箱模式_enableMutationsToDirtySubtrees 提供安全执行环境:临时放宽框架限制执行用户代码后立即恢复平衡灵活性与安全性实战应用示例1. 经典响应式布局Widget build(BuildContext context) { return LayoutBuilder( builder: (context, constraints) { // 根据宽度决定布局方式 if (constraints.maxWidth > 600) { return Row(children: [Sidebar(), ContentArea()]); } else { return Column(children: [AppBar(), ContentArea()]); } }, ); }2. 动态尺寸计算Widget build(BuildContext context) { return LayoutBuilder( builder: (context, constraints) { final itemWidth = (constraints.maxWidth - 32) / 3; return GridView.builder( gridDelegate: SliverGridDelegateWithFixedCrossAxisCount( crossAxisCount: 3, childAspectRatio: itemWidth / 100, ), itemBuilder: (context, index) => ItemWidget(), ); }, ); }源码设计亮点1. 性能优化约束缓存:通过 _previousConstraints 避免重复构建条件更新:仅在实际变化时触发重建智能调度:根据框架状态选择最佳更新时机2. 错误边界void _rebuildWithConstraints(ConstraintType constraints) { try { built = widget.builder(this, constraints); } catch (e, stack) { built = ErrorWidget.builder(...); // 优雅降级 } // ... 错误处理继续 }3. 调试支持详细的断言检查调试信息收集异常报告机制总结与启示LayoutBuilder 的设计体现了 Flutter 框架的几个核心理念:关注点分离:将构建决策延迟到拥有完整布局信息时性能优先:通过多种优化避免不必要的计算安全第一:在灵活性与框架稳定性间取得平衡声明式表达:通过简单的回调 API 提供强大功能通过深入分析 LayoutBuilder 的源码,我们不仅理解了其工作原理,更能学习到如何设计既灵活又稳定的框架级组件。这种在布局阶段获取约束并动态构建的能力,为 Flutter 的响应式设计提供了坚实的基础设施支持。源码文件:packages/flutter/lib/src/widgets/layout_builder.dart 设计模式:延迟决策、回调注册、安全沙箱 适用场景:响应式布局、动态 UI、约束依赖型组件
-
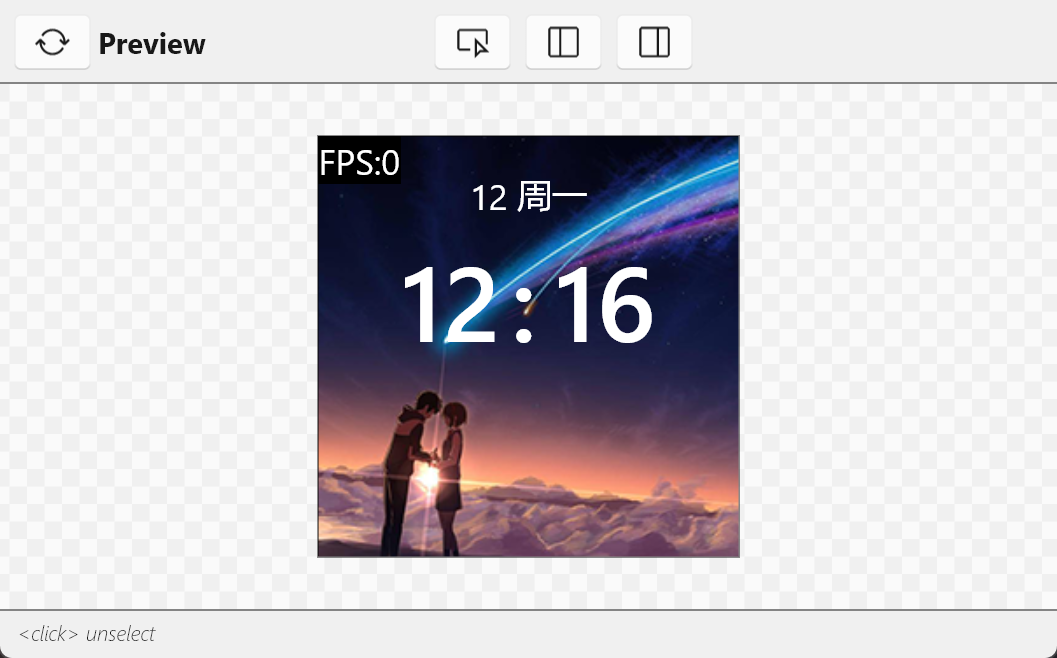
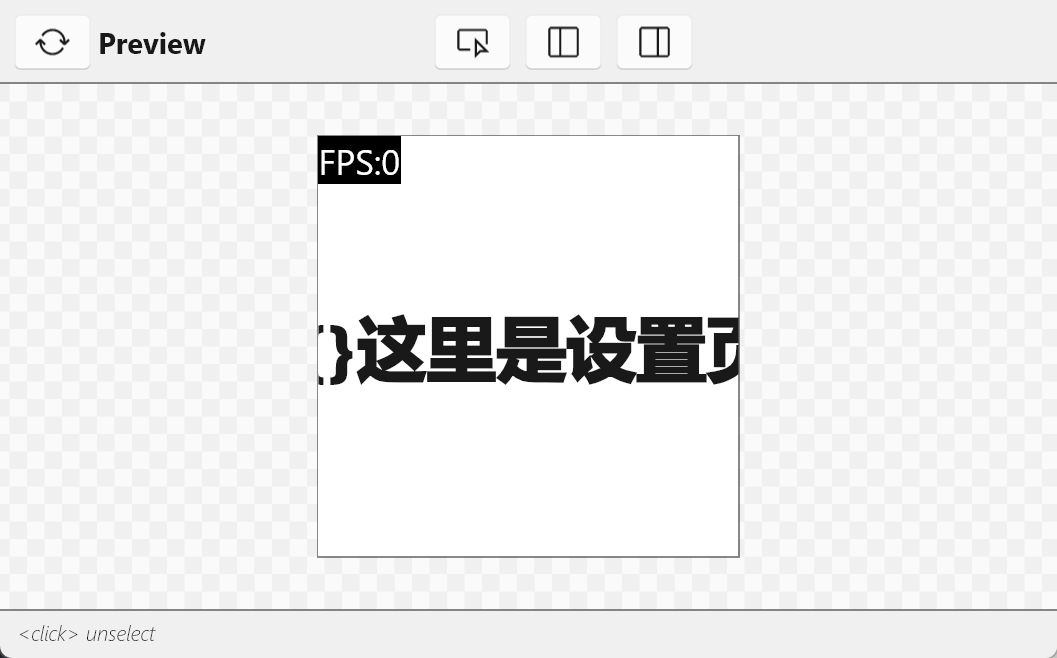
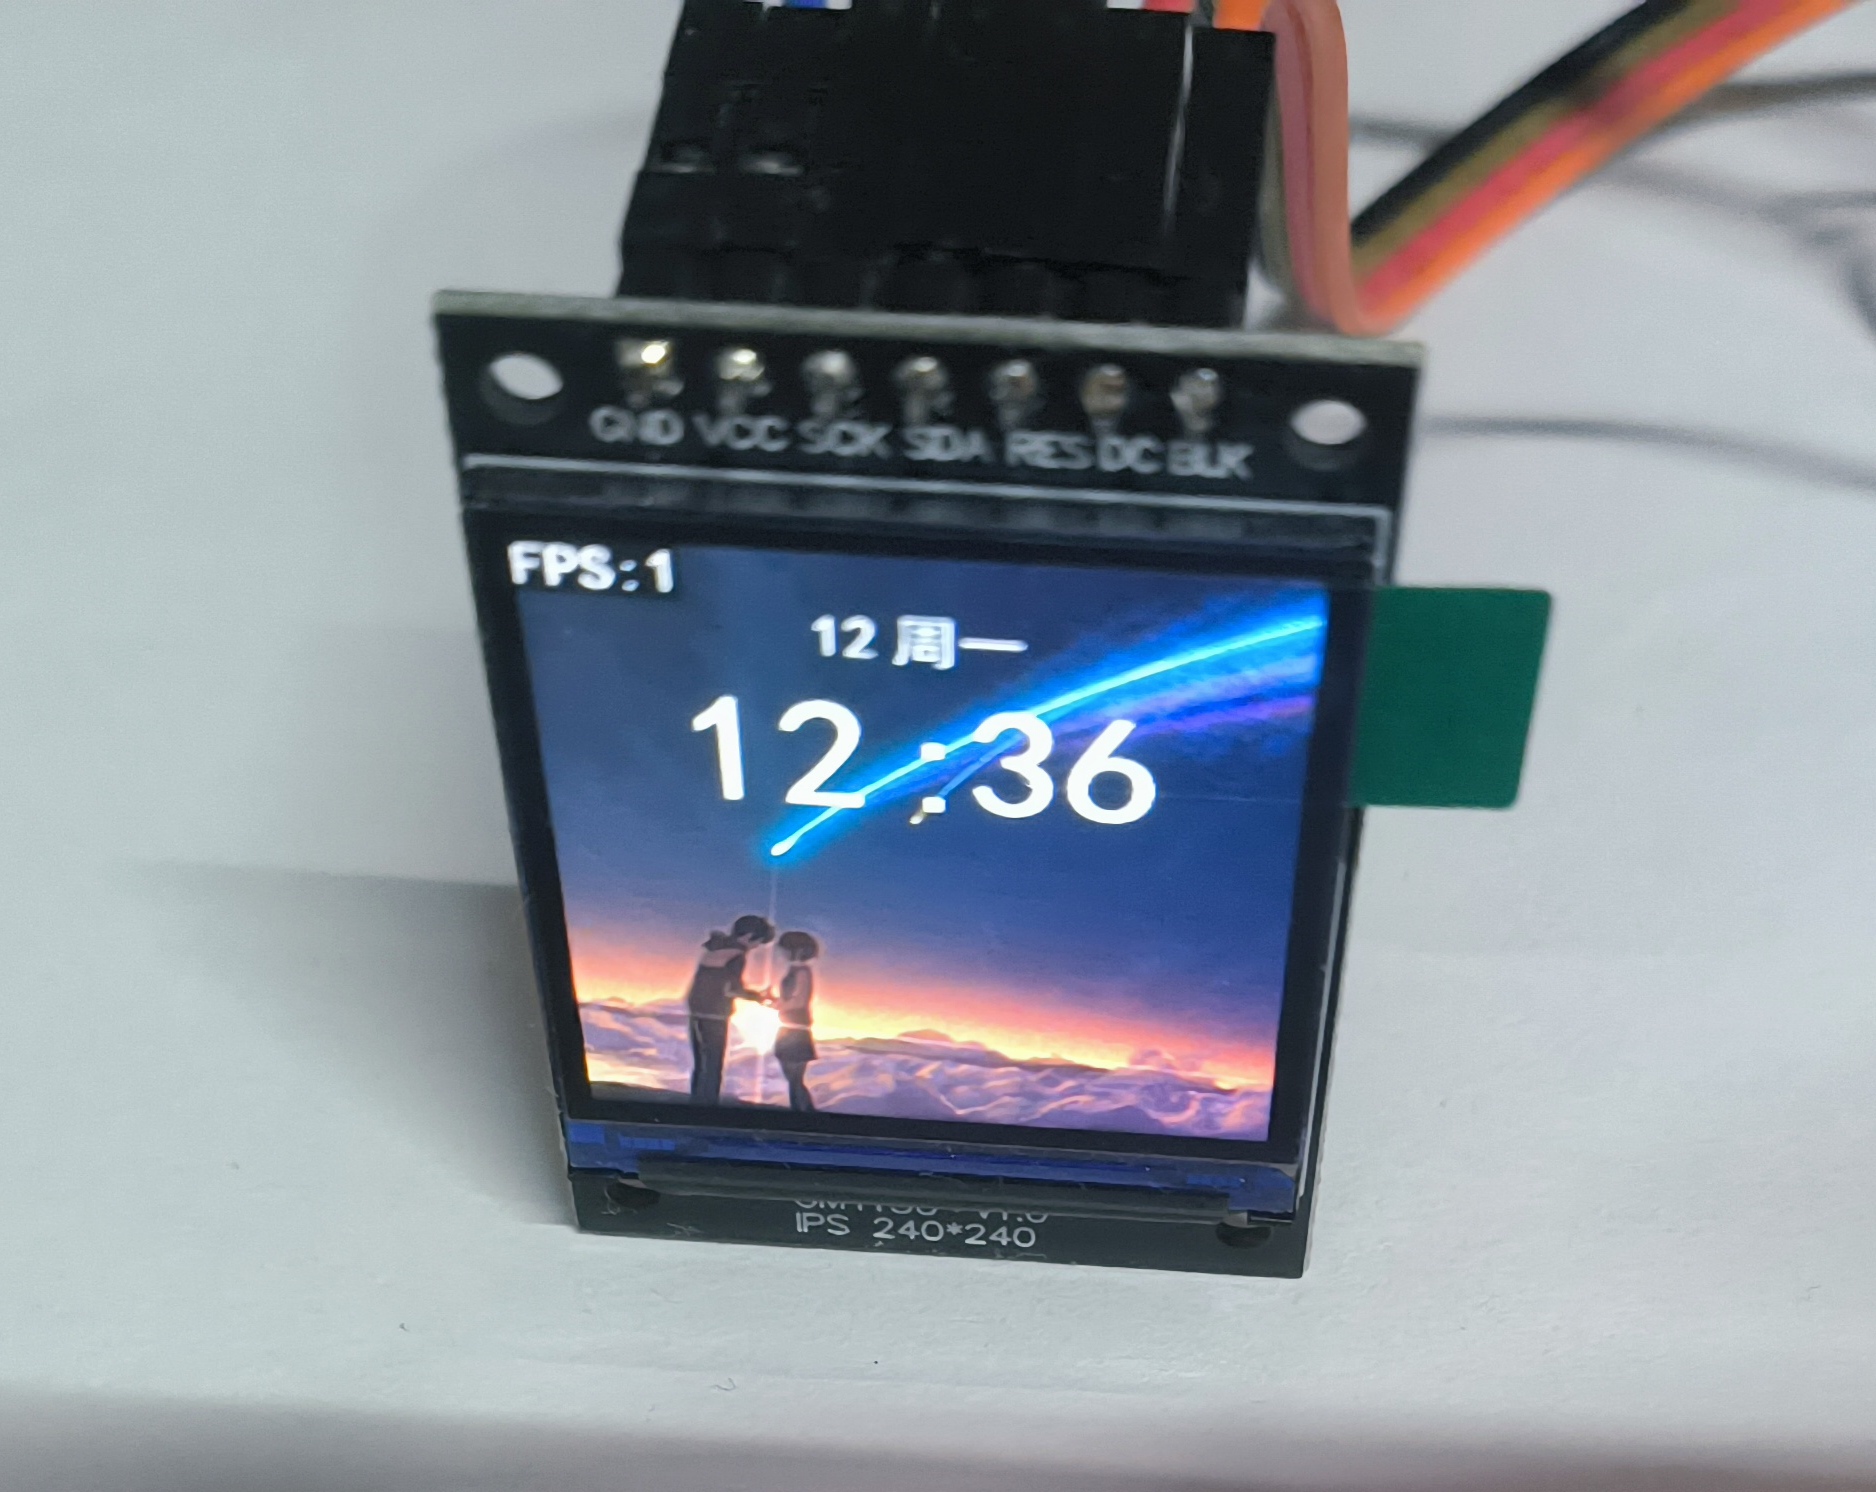
ESP32C3使用Slint渲染TFT屏幕 这个教程算是在st7789屏幕没有买之前就已经开始打算了,之前的使用slint驱动oled也算是为这个打下基础吧创建新项目可以参考 ESP32C3使用Slint渲染OLED屏幕 引入slint依赖,创建跟配置slint跟这篇文章一样,引入的依赖基本上大差不差,只不过这个项目还需要引入st7789屏幕的相关依赖。然后在Cargo.toml中添加依赖 [dependencies] # 基础依赖 critical-section = "1.2.0" esp-hal = { version = "1.0.0-beta.0", features = ["esp32c3","unstable"] } esp-alloc = "0.7.0" esp-println = { version = "0.13.1",features = ["esp32c3","log"] } log = "0.4.27" esp-backtrace = { version = "0.15.1" ,features = ["esp32c3","println","panic-handler"]} # 图形相关 embedded-hal = "1.0.0" embedded-graphics-core = "0.4.0" embedded-graphics = "0.8.1" embedded-graphics-framebuf = "0.5.0" display-interface = "0.5.0" display-interface-spi = "0.5.0" mipidsi = "0.9.0" embedded-hal-bus = "0.3.0" # 异步 esp-hal-embassy = { version = "0.7.0", features = ["esp32c3"] } embassy-time = { version = "0.4.0", features = ["generic-queue-8"] } embassy-executor = { version = "0.7.0",features = ["task-arena-size-20480","executor-thread"] } #embassy-futures = "0.1.1" static_cell = { version = "2.1.0", features = ["nightly"] } tinygif = "0.0.4" [dependencies.slint] git = "https://github.com/slint-ui/slint" rev = "29168bc89270798f6075a0a729c14a3f011ceb4f" # 修复提交的哈希 default-features = false features = [ "compat-1-2", "unsafe-single-threaded", # 启用单线程模式 "libm", "renderer-software", ] [build-dependencies] slint-build = {git = "https://github.com/slint-ui/slint",rev = "29168bc89270798f6075a0a729c14a3f011ceb4f"} 创建ui文件创建 ui/main.slint 文件,作为程序的入口文件import { System,LocalTime,Route , Setting} from "./global.slint"; import { HomePage } from "./page/home_page.slint"; import { SettingPage } from "./page/setting_page.slint"; // 导出给rust代码调用 export { System,LocalTime,Setting } export component MainView inherits Window { background: black; width: System.screen_width; height: System.screen_height; default-font-family: "黑体"; // 简单实现路由 if System.route==Route.HomePage: HomePage{} if System.route==Route.SettingPage: SettingPage{} // 显示帧率 if Setting.fps == true:Rectangle { padding: 2px; x:0px; y:0px; width: fps.width; height: fps.height; background: black; fps:=Text { font-size: 20px; text: @tr("FPS:{}",System.fps); color: white; } } // 触摸切换页面,用于测试 TouchArea { clicked => { if(System.route == Route.HomePage){ System.route = Route.SettingPage; }else{ System.route = Route.HomePage; } } } }创建 ui/global.slint 存储全局变量,跟rust代码进行交互 export enum Route { HomePage, SettingPage } export global System { // 屏幕宽高 out property <length> screen_width:240px; out property <length> screen_height:240px; // 路由页面 in-out property <Route> route:Route.HomePage; // 帧率 in-out property <int> fps:0; } export global Setting { // 开启fps帧率显示 in-out property <bool> fps:true; } export global LocalTime { in-out property <int> hour:12; in-out property <int> minute:12; in-out property <int> scond:30; in-out property <int> year:2025; in-out property <int> month:12; in-out property <int> day:12; in-out property <int> week:1; private property <[string]> weeks:["周日","周一","周二","周三","周四","周五","周六"]; in-out property <string> week_cn:weeks[week]; }创建ui/page/home_page.slint文件展示主页import { System,LocalTime } from "../global.slint"; export component HomePage inherits Rectangle{ width: System.screen_width; height: System.screen_height; // 背景图片 bg:=Image { source: @image-url("../../assets/bg_ndmz.png"); } animate x { easing: ease-in-out; duration: 300ms; } VerticalLayout { spacing: 4px; alignment: start; week:=HorizontalLayout{ padding-top: 20px; alignment: center; spacing: 5px; Text { text: LocalTime.month; color: white; font-size: 20px; } Text { text: LocalTime.week_cn; color: white; font-size: 20px; } } time:=HorizontalLayout { padding: 2px; spacing: 5px; alignment: center; Rectangle { // background: blue; Text { text: LocalTime.hour; font-size: 60px; color: white; font-weight: 500; } } Text { width: 20px; text: ":"; font-size: 60px; color: white; font-weight: 500; } Rectangle { // background: pink; Text { text: LocalTime.minute; font-size: 60px; color: white; font-weight: 500; } } } } // 这里的定时器是简单模拟时间,实际项目应该从rust代码传入时间 Timer { running: true; interval: 1s; triggered => { LocalTime.minute+=1; } } }创建ui/page/setting_page.slint展示设置页面,这里简单做了给跑马灯的效果import { System } from "../global.slint"; export component SettingPage inherits Rectangle{ width: System.screen_width; height: System.screen_height; background: white; property <length> pos_x:0px; text:=Text { x:pos_x; text: "{}这里是设置页面aaaadfsadfsdf"; font-size: 40px; font-weight: 999; } Timer { running: true; interval: 50ms; triggered => { if(pos_x < System.screen_width - text.width){ pos_x = System.screen_width; }else{ pos_x -= 1px; } } } }编写main.rs代码#![no_std] #![no_main] extern crate alloc; use alloc::boxed::Box; use alloc::format; use alloc::rc::Rc; use alloc::string::ToString; use alloc::vec::Vec; use core::cell::RefCell; use core::fmt::Debug; use core::sync::atomic::{AtomicBool, Ordering}; use critical_section::Mutex; use embassy_executor::Spawner; use embassy_time::Timer; use embedded_graphics::mono_font::ascii::FONT_10X20; use embedded_graphics::mono_font::iso_8859_7::FONT_5X8; use embedded_graphics::mono_font::MonoTextStyle; use embedded_graphics::prelude::Primitive; use embedded_graphics::primitives::PrimitiveStyle; use embedded_graphics::text::Text; use embedded_graphics_core::Drawable; use embedded_graphics_core::pixelcolor::{Bgr565, BinaryColor, Rgb565}; use embedded_graphics_core::prelude::{DrawTarget, ImageDrawable, Point, RgbColor, Size}; use embedded_graphics_core::primitives::Rectangle; use embedded_hal::delay::DelayNs; use embedded_hal_bus::spi::{ExclusiveDevice, NoDelay}; use esp_hal::clock::{CpuClock, RadioClockController}; use esp_hal::delay::Delay; use esp_hal::{handler, main, ram, spi, Blocking}; use esp_hal::gpio::{Event, Input, InputConfig, Io, Level, Output, OutputConfig, Pull}; use esp_hal::i2c::master::I2c; use esp_hal::peripherals::Peripherals; use esp_hal::rtc_cntl::Rtc; use esp_hal::spi::master::Config; use esp_hal::spi::master::Spi; use esp_hal::spi::Mode; use esp_hal::time::{Duration, Instant, Rate}; use esp_hal::timer::systimer::SystemTimer; use esp_hal::timer::timg::TimerGroup; use esp_println::logger::{init_logger, init_logger_from_env}; use esp_println::println; use log::{error, info, warn, LevelFilter}; use mipidsi::{Builder, Display}; use mipidsi::interface::SpiInterface; use mipidsi::models::ST7789; use mipidsi::options::{ColorInversion, Orientation}; use slint::platform::{Platform, WindowAdapter}; use slint::platform::software_renderer::{LineBufferProvider, MinimalSoftwareWindow, Rgb565Pixel}; use slint::{invoke_from_event_loop, ModelRc, PhysicalSize, PlatformError, Rgb8Pixel, Rgba8Pixel, SharedPixelBuffer, TimerMode, Weak}; slint::include_modules!(); #[panic_handler] fn panic(info: &core::panic::PanicInfo) -> ! { error!("panic:{}",info); loop {} } #[esp_hal_embassy::main] async fn main(spawner: Spawner) { // generator version: 0.3.1 // init_logger_from_env(); init_logger(LevelFilter::Debug); esp_alloc::heap_allocator!(size: 100 * 1024); info!("分配内存完成"); let config = esp_hal::Config::default().with_cpu_clock(CpuClock::max()); let peripherals =esp_hal::init(config); // 配置异步 let timer0 = SystemTimer::new(peripherals.SYSTIMER); esp_hal_embassy::init(timer0.alarm0); let mut delay = Delay::new(); let mut rst = Output::new(peripherals.GPIO3,Level::Low,OutputConfig::default()); rst.set_high(); let dc = Output::new(peripherals.GPIO4,Level::Low,OutputConfig::default()); let mut backlight = Output::new(peripherals.GPIO5,Level::Low,OutputConfig::default()); let sclk = peripherals.GPIO6; let sda = peripherals.GPIO7; let sdi = peripherals.GPIO8; let cs = peripherals.GPIO10; let spi = Spi::new(peripherals.SPI2, Config::default() .with_mode(Mode::_3) .with_frequency(Rate::from_mhz(60)) ).unwrap() .with_sck(sclk) .with_miso(sdi) .with_mosi(sda); let cs_output = Output::new(cs,Level::High,OutputConfig::default()); let spi_device = ExclusiveDevice::new_no_delay(spi,cs_output).unwrap(); let di = SpiInterface::new(spi_device,dc,unsafe{ &mut BUFFER }); let display = Builder::new(ST7789, di) .display_size(240,240) .invert_colors(ColorInversion::Inverted) .color_order(mipidsi::options::ColorOrder::Rgb) .orientation(Orientation::new()) .reset_pin(rst) .init(&mut delay).unwrap(); println!("display 初始化完成"); backlight.set_high(); info!("开启异步任务"); spawner.spawn(ui_run(display)).ok(); // for inspiration have a look at the examples at https://github.com/esp-rs/esp-hal/tree/esp-hal-v1.0.0-beta.0/examples/src/bin } static mut BUFFER: [u8; 512] = [0_u8; 512]; type DISPLAY = Display<SpiInterface<'static, ExclusiveDevice<Spi<'static,Blocking>,Output<'static>,NoDelay>,Output<'static>>,ST7789,Output<'static>>; #[embassy_executor::task] async fn ui_run(mut display: DISPLAY){ // 创建平台实例 let window = MinimalSoftwareWindow::new( slint::platform::software_renderer::RepaintBufferType::ReusedBuffer, ); window.set_size(PhysicalSize::new(240,240)); let platform = EspPlatform::new(window.clone()); slint::platform::set_platform(Box::new(platform)).unwrap(); // 创建ui let ui = MainView::new().unwrap(); ui.window().set_size(PhysicalSize::new(240,240)); // 初始化显示 display.clear(Rgb565::BLACK).unwrap(); info!("清理屏幕"); // 创建行缓冲区 let display_width = 240; // 根据实际显示宽度设置 let mut the_frame_buffer = [Rgb565Pixel(0); 240 ]; let mut time = Instant::now();; let mut last_frame_time = time.duration_since_epoch(); let mut fps = 0; let mut frame_count = 0; loop { frame_count+=1; // 更新UI状态 slint::platform::update_timers_and_animations(); // 渲染UI window.draw_if_needed(|renderer| { renderer.render_by_line(FrameBuffer{ frame_buffer: &mut the_frame_buffer, stride: display_width,display:&mut display }); }); // 计算FPS let now = time.duration_since_epoch(); if now.as_millis()-last_frame_time.as_millis() >= 1000{ last_frame_time = now; fps = frame_count; frame_count = 0; ui.global::<System>().set_fps(fps); } // 根据动画状态决定是否延迟 if !window.has_active_animations() { if let Some(duration) = slint::platform::duration_until_next_timer_update(){ Timer::after_millis(duration.as_millis() as u64).await; continue; } } Timer::after_millis(10).await; } } // 平台实现结构体 struct EspPlatform{ window: Rc<MinimalSoftwareWindow>, } impl EspPlatform { fn new(window:Rc<MinimalSoftwareWindow>) -> Self { Self { window } } } /// 实现 Platform trait impl Platform for EspPlatform { fn create_window_adapter(&self) -> Result<Rc<dyn WindowAdapter>, PlatformError> { info!("成功创建了window"); Ok(self.window.clone()) } fn duration_since_start(&self) -> core::time::Duration { // 使用定时器获取时间(需要实际硬件计时器实现) let time = Instant::now().duration_since_epoch().as_millis(); // info!("time :{}",time); core::time::Duration::from_millis( time ) } } struct FrameBuffer<'a>{ frame_buffer: &'a mut [Rgb565Pixel], stride: usize,display:&'a mut DISPLAY } impl<'a> LineBufferProvider for FrameBuffer<'a> { type TargetPixel = Rgb565Pixel; fn process_line( &mut self, line: usize, range: core::ops::Range<usize>, render_fn: impl FnOnce(&mut [Self::TargetPixel]), ) { let buf = &mut self.frame_buffer[range.clone()]; render_fn(buf); self.display.set_pixels( range.start as u16, line as _, range.end as u16, line as u16, buf.iter().map(|x|{ embedded_graphics_core::pixelcolor::raw::RawU16::new(x.0).into() }) ).unwrap() } } 效果展示浏览首页页面设置页面最终的效果展示

-
ESP32C3驱动TFT屏幕 因为使用的是新版esp-generate创建的项目,很多api的使用都大改了,网上能搜到的类似的教程也都完全没法用,这个教程是使用最新版esp-hal基于rust开发esp32c3驱动st7789屏幕。看网上有些项目叫MOSI,MISO的,也有叫SDI,SDO,这两个本质就是一个东西,在不同协议叫法不同。SPI 协议中大家都喜欢叫 MOSI / MISO,有些芯片厂商文档上写的是 SDI / SDO;MOSI == SDI(对于从机):表示“数据输入”MISO == SDO(对于从机):表示“数据输出”项目创建在 rust裸机开发esp32c3 的基础上,先新建一个最基础的环境引入依赖[dependencies] critical-section = "1.2.0" esp-hal = { version = "1.0.0-beta.0", features = ["esp32c3","unstable"] } esp-println = { version = "0.13.1",features = ["esp32c3","log"] } log = "0.4.27" # 图形相关 embedded-hal = "1.0.0" embedded-graphics-core = "0.4.0" embedded-graphics = "0.8.1" embedded-graphics-framebuf = "0.5.0" display-interface = "0.5.0" display-interface-spi = "0.5.0" mipidsi = "0.9.0" embedded-hal-bus = "0.3.0" 编写main.rs代码#![no_std] #![no_main] use embedded_graphics::Drawable; use embedded_graphics::image::{Image, ImageRawLE}; use embedded_graphics::pixelcolor::Rgb565; use embedded_graphics::prelude::{DrawTarget, Point, Primitive, RgbColor}; use embedded_graphics::primitives::PrimitiveStyle; use embedded_graphics_core::prelude::Size; use embedded_graphics_core::primitives::Rectangle; use embedded_hal::delay::DelayNs; use embedded_hal::digital::ErrorType; use embedded_hal_bus::spi::ExclusiveDevice; use esp_hal::clock::CpuClock; use esp_hal::delay::Delay; use esp_hal::gpio::{Level, Output, OutputConfig}; use esp_hal::main; use esp_hal::spi::master::{Config, Spi}; use esp_hal::spi::Mode; use esp_hal::time::{Duration, Instant, Rate}; use esp_println::logger::init_logger; use esp_println::println; use log::{error, LevelFilter}; use mipidsi::_mock::MockSpi; use mipidsi::models::ST7789; use mipidsi::Builder; use mipidsi::interface::SpiInterface; use mipidsi::options::Orientation; #[panic_handler] fn panic(e: &core::panic::PanicInfo) -> ! { println!("{}",e); loop { } } #[main] fn main() -> ! { // generator version: 0.3.1 let config = esp_hal::Config::default().with_cpu_clock(CpuClock::max()); init_logger(LevelFilter::Debug); let peripherals = esp_hal::init(config); let mut delay = Delay::new(); let mut rst = Output::new(peripherals.GPIO3,Level::Low,OutputConfig::default()); delay.delay_ms(20); // 保持 RST 为低电平至少 10~20ms rst.set_high(); // 然后再拉高 delay.delay_ms(100); // 拉高后也延迟一下,再继续初始化 let dc = Output::new(peripherals.GPIO4,Level::Low,OutputConfig::default()); let mut backlight = Output::new(peripherals.GPIO5,Level::Low,OutputConfig::default()); let sclk = peripherals.GPIO6; let sda = peripherals.GPIO7; let sdi = peripherals.GPIO8; let cs = peripherals.GPIO10; let spi = Spi::new(peripherals.SPI2, Config::default() .with_mode(Mode::_3) .with_frequency(Rate::from_mhz(40)) ).unwrap() .with_sck(sclk) .with_miso(sdi) .with_mosi(sda); let cs_output = Output::new(cs,Level::High,OutputConfig::default()); let spi_device = ExclusiveDevice::new_no_delay(spi,cs_output).unwrap(); let mut buffer = [0_u8; 512]; let di = SpiInterface::new(spi_device,dc,&mut buffer); let mut display = Builder::new(ST7789,di) .display_size(240,240) .orientation(Orientation::new()) .reset_pin(rst) .init(&mut delay).unwrap(); println!("display 初始化完成"); backlight.set_high(); let raw_image_data = ImageRawLE::new(include_bytes!("../../assets/ferris.raw"), 86); let mut x = 0; loop { display.clear(Rgb565::BLACK).unwrap(); let ferris = Image::new(&raw_image_data, Point::new(x, 0)); // draw image on black background display.clear(Rgb565::BLACK).unwrap(); ferris.draw(&mut display).unwrap(); delay.delay_millis(400); x+=10; if x >= 140{ x = 0; } } // for inspiration have a look at the examples at https://github.com/esp-rs/esp-hal/tree/esp-hal-v1.0.0-beta.0/examples/src/bin } 效果展示{callout color="#efb44d"}屏幕是倒着放到,图片显示是正的{/callout}{lamp/}本项目参考了mipidsi(esp32c3) esp-idf-hal/examples /spi_st7789.rs