

搜索到
116
篇与
的结果
-
Java Quartz 定时任务调度 介绍Quartz 是一个功能强大的 Java 任务调度库,能够调度执行定时任务或周期性任务。它支持复杂的调度方式,适用于分布式任务系统。本篇文章将介绍如何在 Java 项目中使用 Quartz。1. 添加依赖在使用 Quartz 之前,需要在项目中引入相应的依赖库。以下是基于 Maven 的项目依赖:<dependency> <groupId>org.quartz-scheduler</groupId> <artifactId>quartz</artifactId> <version>2.3.2</version> </dependency>对于 Gradle,可以添加以下依赖:implementation 'org.quartz-scheduler:quartz:2.3.2'2. 创建一个 JobQuartz 中的每个任务都由一个 Job 来表示。Job 是一个接口,所有任务类都需要实现它的 execute() 方法。import org.quartz.Job; import org.quartz.JobExecutionContext; import org.quartz.JobExecutionException; public class HelloJob implements Job { @Override public void execute(JobExecutionContext context) throws JobExecutionException { System.out.println("Hello Quartz! 当前时间: " + System.currentTimeMillis()); } }3. 创建 JobDetail 和 TriggerJobDetail 表示任务的定义,而 Trigger 表示任务的触发方式(如何时执行)。以下代码展示了如何创建一个简单的任务,并定义每隔 5 秒执行一次。import org.quartz.*; import org.quartz.impl.StdSchedulerFactory; public class QuartzScheduler { public static void main(String[] args) throws SchedulerException { // 1. 创建 Scheduler 实例 Scheduler scheduler = StdSchedulerFactory.getDefaultScheduler(); // 2. 定义 JobDetail JobDetail jobDetail = JobBuilder.newJob(HelloJob.class) .withIdentity("helloJob", "group1") .build(); // 3. 定义 Trigger(5 秒执行一次) Trigger trigger = TriggerBuilder.newTrigger() .withIdentity("simpleTrigger", "group1") .startNow() .withSchedule(SimpleScheduleBuilder.simpleSchedule() .withIntervalInSeconds(5) .repeatForever()) .build(); // 4. 将 JobDetail 和 Trigger 绑定到调度器上 scheduler.scheduleJob(jobDetail, trigger); // 5. 启动调度器 scheduler.start(); // 6. 调度器运行一段时间后关闭 try { Thread.sleep(20000); } catch (InterruptedException e) { e.printStackTrace(); } // 7. 停止调度器 scheduler.shutdown(); } }解释:Scheduler 是 Quartz 的核心,它管理和控制任务的执行。JobDetail 是对任务的定义,包含任务的类和任务的元数据。Trigger 用于定义任务的触发方式。这里使用 SimpleScheduleBuilder 每隔 5 秒重复执行一次。调度器启动后,任务会按设定的触发器条件执行。4. 使用 CronTrigger除了 SimpleTrigger,Quartz 还支持更加复杂的 CronTrigger,它允许使用 Cron 表达式来定义任务的执行时间。Trigger cronTrigger = TriggerBuilder.newTrigger() .withIdentity("cronTrigger", "group1") .withSchedule(CronScheduleBuilder.cronSchedule("0/10 * * ? * * *")) .build();上面的 Cron 表达式 "0/10 * * ? * * *" 表示每隔 10 秒执行一次。5. 处理任务中的数据在实际应用中,任务通常需要一些上下文数据。我们可以使用 JobDataMap 来传递数据。JobDetail jobDetail = JobBuilder.newJob(HelloJob.class) .withIdentity("helloJob", "group1") .usingJobData("message", "Hello from Quartz!") .build();在 Job 的 execute() 方法中可以通过 JobExecutionContext 获取传递的数据:public class HelloJob implements Job { @Override public void execute(JobExecutionContext context) throws JobExecutionException { JobDataMap dataMap = context.getJobDetail().getJobDataMap(); String message = dataMap.getString("message"); System.out.println("执行任务: " + message + " 当前时间: " + System.currentTimeMillis()); } }6. 任务持久化Quartz 支持将任务信息持久化到数据库中。使用 JDBC JobStore 可以让任务在调度器重启后依然存在。为了启用持久化功能,需要配置 Quartz 的 quartz.properties 文件并设置相应的数据源。以下是部分配置示例:org.quartz.jobStore.class=org.quartz.impl.jdbcjobstore.JobStoreTX org.quartz.jobStore.driverDelegateClass=org.quartz.impl.jdbcjobstore.StdJDBCDelegate org.quartz.jobStore.dataSource=myDS org.quartz.dataSource.myDS.driver=com.mysql.cj.jdbc.Driver org.quartz.dataSource.myDS.URL=jdbc:mysql://localhost:3306/quartz org.quartz.dataSource.myDS.user=root org.quartz.dataSource.myDS.password=password7. 总结本文介绍了 Quartz 的基本使用方法,从创建简单任务到使用 Cron 表达式进行任务调度,并且还介绍了如何传递数据和持久化任务。Quartz 提供了非常灵活的定时任务调度能力,适合各种场景的任务调度需求。
-
 rust使用ffmpeg 使用命令创建项目cargo new ffmpeg-rust添加ffmpeg-next库cargo add ffmpeg-next这个时候cargo run肯定会报一堆错误使用这个ffmpeg-next官方仓库的 wiki 中的 GNU 构建指南https://github.com/zmwangx/rust-ffmpeg/wiki/Notes-on-building这里回车选择默认全部安装vcpkg integrate install vcpkg install ffmpeg[core,avcodec,avformat,swscale,avdevice,avfilter] --triplet x64-windows --recurse这时候在执行cargo run应该就不报错了
 -
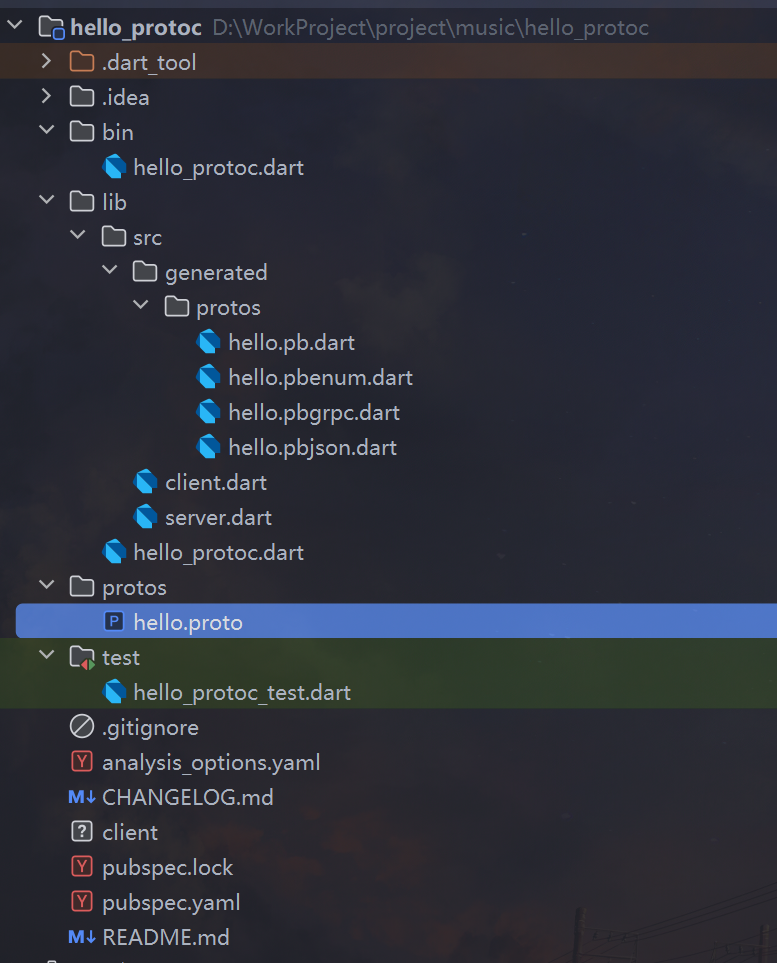
dart使用grpc 1.添加依赖项: 在你的 pubspec.yaml 文件中,添加 gRPC 和 protobuf 的依赖:dependencies: protobuf: ^3.1.0 grpc: ^4.0.12.安装 Dart 的 protoc_pluginprotoc_plugin 是 Dart 的 gRPC 插件,它可以将 .proto 文件编译为 Dart 代码。通过 Dart 的包管理工具 pub 来安装:dart pub global activate protoc_plugin 并配置环境变量3.生成 Protocol Buffers 代码: 创建一个 .proto 文件,定义服务和消息hello.proto:syntax = "proto3"; package hello; service Hello { rpc SayHello (HelloRequest) returns (HelloReply); } message HelloRequest { string name = 1; } message HelloReply { string message = 1; } 4.使用 protoc 生成 Dart 代码protoc --dart_out=grpc:lib/src/generated -I. lib/protos/hello.proto --dart_out=grpc:lib/src/generated:生成带 gRPC 支持的 Dart 文件,并将其放入 lib/src/generated 目录。-I .:指定 .proto 文件的路径(.表示当前目录)。lib/protos/hello.proto:指定你要编译的 .proto 文件。5.编写客户端代码client.dartimport 'package:grpc/grpc.dart'; import 'generated/protos/hello.pb.dart'; // 引入生成的消息定义 import 'generated/protos/hello.pbgrpc.dart'; // 引入生成的 gRPC 客户端和服务 Future<void> main() async { // 创建一个 gRPC 客户端连接到服务端,假设服务端在本地的 50051 端口 final channel = ClientChannel( 'localhost', port: 50051, options: const ChannelOptions(credentials: ChannelCredentials.insecure()), ); final client = HelloClient(channel); try { // 调用 sayHello 并打印响应 for(int i = 0;i<10;i++) { final response = await client.sayHello(HelloRequest() ..name = "hello grpc$i"); print('Received: $response'); } } finally { // 关闭客户端通道 await channel.shutdown(); } } 6.编写服务端代码server.dartimport 'package:grpc/grpc.dart'; import 'generated/protos/hello.pb.dart'; import 'generated/protos/hello.pbgrpc.dart'; // 实现 Hello 服务 class HelloService extends HelloServiceBase { @override Future<HelloReply> sayHello(ServiceCall call, HelloRequest request) async { print("server message:${request.name}"); // 构建响应 return HelloReply()..message = 'Hello, ${request.name}!'; } } Future<void> main() async { // 启动 gRPC 服务端 final server = Server.create(services: [HelloService()]); await server.serve(port: 50051); print('Server listening on port ${server.port}...'); } 7.运行代码运行服务端dart run lib/src/server.dart 运行客户端dart run lib/src/client.dart 项目的目录结构:
-
-
java函数式接口 Java 函数式编程的核心是通过函数式接口实现函数作为参数传递或作为结果返回。函数式接口只有一个抽象方法,Java 8 通过 @FunctionalInterface 注解来确保接口符合该条件。1. Function<T, R>功能:接收一个参数,返回一个结果,通常用于数据转换。方法:R apply(T t):将 T 类型的参数转换为 R 类型的结果。andThen(Function<? super R, ? extends V> after):组合另一个 Function,先执行当前函数,再执行 after。compose(Function<? super V, ? extends T> before):组合另一个 Function,先执行 before,再执行当前函数。适用场景:对象映射、数据转换。示例:Function<String, Integer> stringToLength = String::length; Function<Integer, Integer> square = x -> x * x; Function<String, Integer> combinedFunction = stringToLength.andThen(square); System.out.println(combinedFunction.apply("hello")); // 输出: 252. BiFunction<T, U, R>功能:接收两个参数,返回一个结果。适合处理两个输入的转换或操作。方法:R apply(T t, U u):接收 T 和 U 类型的两个参数,返回 R 类型的结果。andThen(Function<? super R, ? extends V> after):组合另一个 Function,先执行当前函数,再执行 after。适用场景:例如计算两个数的和、将两个对象合并为一个结果。示例:BiFunction<Integer, Integer, Integer> sum = Integer::sum; BiFunction<Integer, Integer, String> sumToString = sum.andThen(String::valueOf); System.out.println(sumToString.apply(3, 5)); // 输出: 83. Consumer<T>功能:接收一个参数,不返回结果,常用于执行一些副作用操作。方法:void accept(T t):对参数执行操作,不返回结果。andThen(Consumer<? super T> after):组合另一个 Consumer,先执行当前操作,再执行 after。适用场景:打印输出、修改对象属性、记录日志。示例:Consumer<String> printConsumer = System.out::println; Consumer<String> upperCaseConsumer = s -> System.out.println(s.toUpperCase()); printConsumer.andThen(upperCaseConsumer).accept("hello"); // 输出: // hello // HELLO4. BiConsumer<T, U>功能:接收两个参数,不返回结果,适合处理两个输入的副作用操作。方法:void accept(T t, U u):对两个参数执行操作,不返回结果。andThen(BiConsumer<? super T, ? super U> after):组合另一个 BiConsumer,先执行当前操作,再执行 after。适用场景:处理两个输入的场景,如将两个参数打印或组合处理。示例:BiConsumer<String, Integer> printBoth = (s, i) -> System.out.println(s + ": " + i); printBoth.accept("Age", 25); // 输出: Age: 255. Supplier<T>功能:不接收参数,返回一个结果。适合用于延迟生成数据或提供默认值。方法:T get():获取结果。适用场景:延迟加载、默认值生成。示例:Supplier<Double> randomSupplier = Math::random; System.out.println(randomSupplier.get()); // 输出: 随机数6. Predicate<T>功能:接收一个参数,返回布尔值,用于条件判断。方法:boolean test(T t):对参数进行条件判断,返回 true 或 false。and(Predicate<? super T> other):组合另一个 Predicate,两个条件都为 true 时返回 true。or(Predicate<? super T> other):组合另一个 Predicate,任意一个条件为 true 时返回 true。negate():返回当前 Predicate 的反结果。适用场景:过滤、条件判断。示例:Predicate<Integer> isEven = n -> n % 2 == 0; Predicate<Integer> isPositive = n -> n > 0; System.out.println(isEven.and(isPositive).test(4)); // 输出: true System.out.println(isEven.or(isPositive).test(-3)); // 输出: true7. BiPredicate<T, U>功能:接收两个参数,返回布尔值,用于条件判断。方法:boolean test(T t, U u):对两个参数进行条件判断,返回 true 或 false。适用场景:比较两个值,或者根据两个值执行条件判断。示例:BiPredicate<String, Integer> lengthGreaterThan = (s, i) -> s.length() > i; System.out.println(lengthGreaterThan.test("hello", 3)); // 输出: true8. UnaryOperator<T>功能:是 Function 的特例,输入输出类型相同,适合用于对输入进行修改和返回同类型的值。方法:T apply(T t):接收 T 类型的参数,返回修改后的 T 类型值。andThen(UnaryOperator<T> after):组合另一个 UnaryOperator,先执行当前操作,再执行 after。compose(UnaryOperator<T> before):组合另一个 UnaryOperator,先执行 before 操作,再执行当前操作。适用场景:对输入进行简单的转换和操作,例如数学运算。示例:UnaryOperator<Integer> square = x -> x * x; System.out.println(square.apply(4)); // 输出: 169. BinaryOperator<T>功能:是 BiFunction 的特例,接收两个相同类型的参数,返回一个相同类型的结果。方法:T apply(T t1, T t2):接收两个相同类型的参数,返回一个相同类型的结果。minBy(Comparator<? super T> comparator):返回一个 BinaryOperator,使用给定的比较器比较两个参数并返回较小的一个。maxBy(Comparator<? super T> comparator):返回一个 BinaryOperator,使用给定的比较器比较两个参数并返回较大的一个。适用场景:用于两个相同类型的数据比较、合并、运算等。示例:BinaryOperator<Integer> sum = Integer::sum; System.out.println(sum.apply(3, 7)); // 输出: 10 BinaryOperator<Integer> max = BinaryOperator.maxBy(Integer::compare); System.out.println(max.apply(3, 7)); // 输出: 710. ToIntFunction<T>功能:接收一个 T 类型参数,返回一个 int 值。常用于从对象中提取整数值。方法:int applyAsInt(T t):接收 T 类型的参数,返回 int 值。适用场景:将对象映射为整数值,如从字符串中提取长度。示例:ToIntFunction<String> stringLengthFunction = String::length; System.out.println(stringLengthFunction.applyAsInt("Hello")); // 输出: 511. ToDoubleFunction<T>功能:接收一个 T 类型参数,返回一个 double 值。常用于从对象中提取浮点数值。方法:double applyAsDouble(T t):接收 T 类型的参数,返回 double 值。适用场景:将对象映射为浮点数值,如从对象中提取某个浮点属性。示例:ToDoubleFunction<Integer> half = n -> n / 2.0; System.out.println(half.applyAsDouble(10)); // 输出: 5.012. IntPredicate功能:接收一个 int 参数,返回布尔值。用于对整数进行条件判断。方法:boolean test(int value):对 int 参数进行条件判断。适用场景:判断整数是否满足某个条件。示例:IntPredicate isEven = n -> n % 2 == 0; System.out.println(isEven.test(4)); // 输出: true13. IntConsumer功能:接收一个 int 参数,不返回结果。适合对整数进行某些操作。方法:void accept(int value):对 int 参数执行操作。andThen(IntConsumer after):组合另一个 IntConsumer,先执行当前操作,再执行 after。适用场景:处理或记录 int 类型的数据,比如打印、操作日志等。示例:IntConsumer printInt = System.out::println; IntConsumer doubleAndPrint = i -> System.out.println(i * 2); printInt.andThen(doubleAndPrint).accept(5); // 输出: // 5 // 1014. IntFunction<R>功能:接收一个 int 参数,返回一个结果。用于将整数转换为其他类型的对象。方法:R apply(int value):接收 int 参数,返回 R 类型结果。适用场景:将整数映射为其他对象类型,比如将索引映射到某个值。示例:IntFunction<String> intToString = Integer::toString; System.out.println(intToString.apply(10)); // 输出: "10"15. IntSupplier功能:不接收参数,返回一个 int 值。常用于生成整数值。方法:int getAsInt():获取结果。适用场景:生成随机数、序列号或延迟生成某个整数值。示例:IntSupplier randomInt = () -> (int) (Math.random() * 100); System.out.println(randomInt.getAsInt()); // 输出: 随机整数16. LongFunction<R>功能:接收一个 long 参数,返回一个结果。适合将 long 类型的数据转换为其他类型的对象。方法:R apply(long value):接收 long 参数,返回 R 类型结果。适用场景:类似于 IntFunction,但处理的是 long 数据。示例:LongFunction<String> longToString = Long::toString; System.out.println(longToString.apply(100000L)); // 输出: "100000"17. DoublePredicate功能:接收一个 double 参数,返回布尔值。用于对浮点数进行条件判断。方法:boolean test(double value):对 double 参数进行条件判断。适用场景:判断浮点数是否满足某个条件。示例:DoublePredicate isPositive = d -> d > 0.0; System.out.println(isPositive.test(3.14)); // 输出: true18. DoubleConsumer功能:接收一个 double 参数,不返回结果。适合对浮点数进行某些操作。方法:void accept(double value):对 double 参数执行操作。andThen(DoubleConsumer after):组合另一个 DoubleConsumer,先执行当前操作,再执行 after。适用场景:类似于 IntConsumer,但处理的是 double 数据。示例:DoubleConsumer printDouble = System.out::println; DoubleConsumer halfAndPrint = d -> System.out.println(d / 2); printDouble.andThen(halfAndPrint).accept(8.0); // 输出: // 8.0 // 4.019. DoubleFunction<R>功能:接收一个 double 参数,返回一个结果。用于将 double 数据转换为其他类型的对象。方法:R apply(double value):接收 double 参数,返回 R 类型结果。适用场景:将浮点数映射为其他对象类型。示例:DoubleFunction<String> doubleToString = Double::toString; System.out.println(doubleToString.apply(3.1415)); // 输出: "3.1415"20. BinaryOperator<T>功能:接收两个相同类型的参数,返回一个相同类型的结果。是 BiFunction<T, T, T> 的特例,常用于合并或比较两个值。方法:T apply(T t1, T t2):接收两个相同类型的参数,返回一个相同类型的结果。minBy(Comparator<? super T> comparator):返回使用给定比较器的较小值。maxBy(Comparator<? super T> comparator):返回使用给定比较器的较大值。适用场景:合并或比较两个相同类型的对象,例如求最大值或最小值。示例:BinaryOperator<Integer> min = BinaryOperator.minBy(Integer::compare); System.out.println(min.apply(3, 5)); // 输出: 3总结Java 函数式编程提供了一系列的函数式接口,覆盖了各种常见的操作场景,如数据转换、条件判断、副作用操作等。通过这些接口,开发者可以更方便地使用 Lambda 表达式进行简洁、高效的编程。这些接口大部分都支持组合操作,如 andThen 和 compose,使得操作链条更加灵活。在实际应用中,选择合适的函数式接口可以极大简化代码逻辑,提高可读性与维护性。