
搜索到
13
篇与
的结果
-
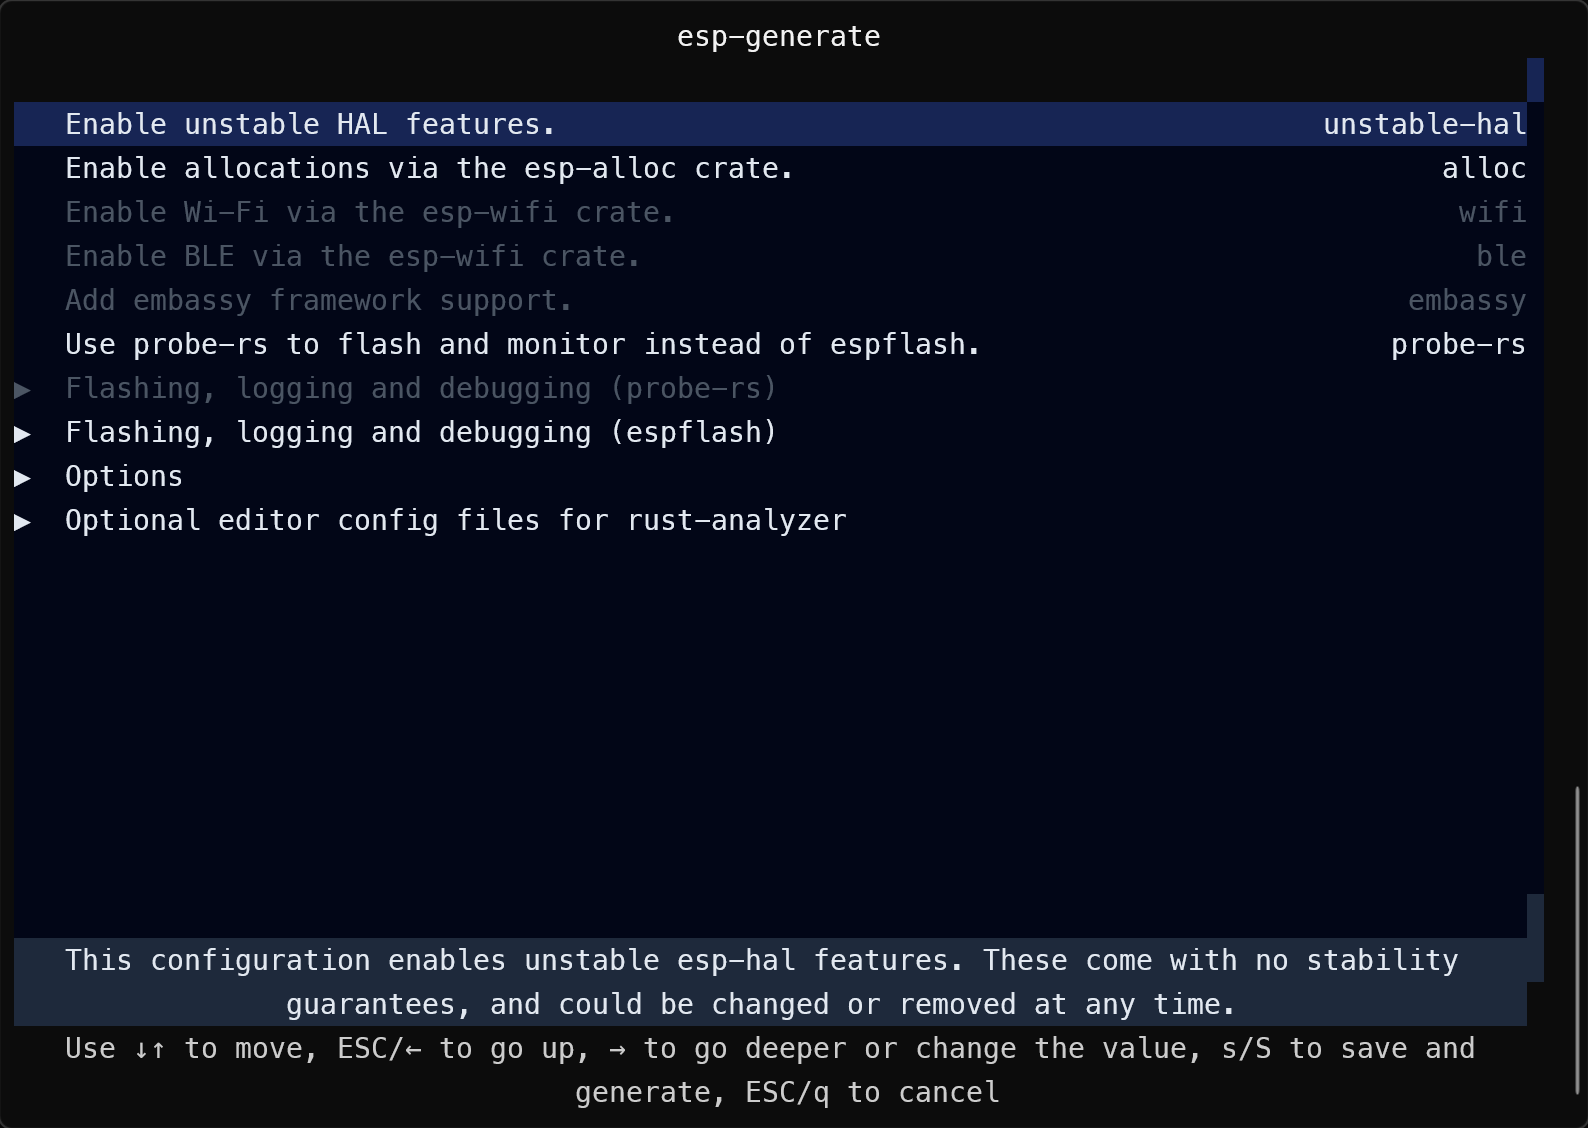
 rust裸机开发esp32c3 安装esp-generate# 安装新版生成工具 cargo install esp-generate # 安装依赖工具链 cargo install espup espup install激活环境变量source $HOME/export-esp.sh # linuxWindows用户默认在C:\Users\HOME目录下有一个 export-esp.ps1文件,双击执行激活环境变量使用esp-genertate 创建新项目esp-generate --chip=esp32c3 demo这个项目是个hello world项目,不需要额外的配置,接着按s创建项目添加依赖在Cargo.toml的[dependencies]添加println依赖esp-println = { version = "0.13.1",features = ["esp32c3","log"] }点亮LED修改mian.rs点亮一个led#![no_std] #![no_main] use esp_hal::clock::CpuClock; use esp_hal::gpio::{Level, Output, OutputConfig}; use esp_hal::main; use esp_hal::time::{Duration, Instant}; use esp_println::println; #[panic_handler] fn panic(_: &core::panic::PanicInfo) -> ! { loop {} } #[main] fn main() -> ! { // generator version: 0.3.1 let config = esp_hal::Config::default().with_cpu_clock(CpuClock::max()); let peripherals = esp_hal::init(config); let mut led = Output::new(peripherals.GPIO9, Level::Low, OutputConfig::default()); let mut count = 0; loop { let delay_start = Instant::now(); led.toggle(); println!("第{count}次数改变led状态"); count+=1; while delay_start.elapsed() < Duration::from_millis(1500) {} } // for inspiration have a look at the examples at https://github.com/esp-rs/esp-hal/tree/esp-hal-v1.0.0-beta.0/examples/src/bin } 成功打印日志
 -
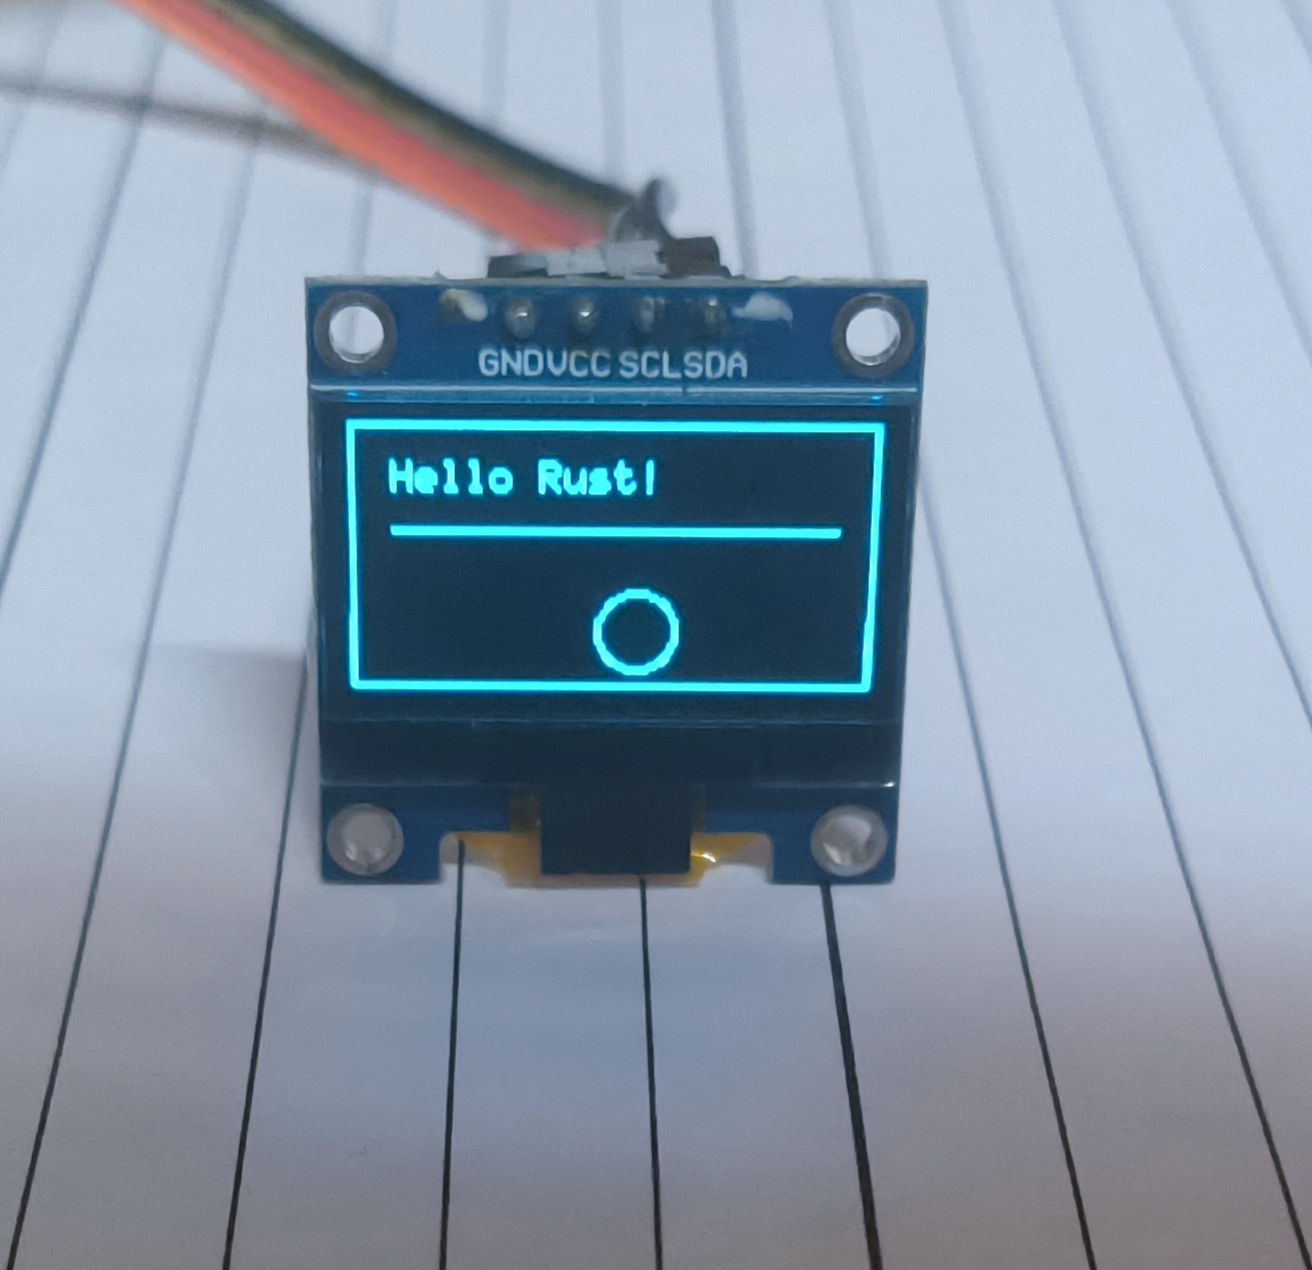
rust开发esp32c3驱动oled屏幕 使用的是 I2C SSD1306 0.96寸的OLED屏幕1.在Cargo.toml中添加图形库依赖# 处理ssd1306屏幕 ssd1306 = {version = "0.10.0",features = ["graphics"]} embedded-graphics = "0.8.1"完整配置 Cargo.toml[package] name = "esp32c3-oled-demo" version = "0.1.0" authors = ["suxii <m@suxii.cn>"] edition = "2021" resolver = "2" rust-version = "1.77" [[bin]] name = "esp32c3-oled-demo" harness = false # do not use the built in cargo test harness -> resolve rust-analyzer errors [features] default = [] experimental = ["esp-idf-svc/experimental"] [dependencies] log = "0.4" esp-idf-svc = { version = "0.51", features = ["critical-section", "embassy-time-driver", "embassy-sync","experimental","std"] } futures = "0.3.31" anyhow = "1.0.98" esp-idf-hal = "0.45.2" # 处理ssd1306屏幕 ssd1306 = {version = "0.10.0",features = ["graphics"]} embedded-graphics = "0.8.1" [build-dependencies] embuild = "0.33" 2.在main.rs中编写rust代码use esp_idf_hal::{ delay::FreeRtos, i2c::*, peripherals::Peripherals, prelude::*, }; use embedded_graphics::{ mono_font::{ascii::FONT_6X10, MonoTextStyle}, pixelcolor::BinaryColor, prelude::*, primitives::{Circle, Line, PrimitiveStyle, Rectangle}, text::Text }; use ssd1306::{I2CDisplayInterface, Ssd1306, prelude::*, size::DisplaySize128x64}; fn main() -> anyhow::Result<()> { esp_idf_hal::sys::link_patches(); // 初始化外设 let peripherals = Peripherals::take()?; // 配置I2C let i2c = peripherals.i2c0; let sda = peripherals.pins.gpio5; let scl = peripherals.pins.gpio6; let config = I2cConfig::new().baudrate(400.kHz().into()); let i2c = I2cDriver::new(i2c, sda, scl, &config)?; // 创建SSD1306接口 let interface = I2CDisplayInterface::new(i2c); let mut display = Ssd1306::new( interface, DisplaySize128x64, DisplayRotation::Rotate0 ).into_buffered_graphics_mode(); // 初始化显示屏 display.init().expect("SSD1306 init failed"); display.flush().expect("Failed to flush display"); // 创建图形样式 let text_style = MonoTextStyle::new(&FONT_6X10, BinaryColor::On); let line_style = PrimitiveStyle::with_stroke(BinaryColor::On, 1); let mut run_x = 64; loop { // 清空屏幕 display.clear(BinaryColor::Off).unwrap(); // 绘制边框 Rectangle::new(Point::new(0, 0), Size::new(128, 64)) .into_styled(line_style) .draw(&mut display).unwrap(); // 绘制文本 Text::new("Hello Rust!", Point::new(10, 15), text_style) .draw(&mut display).unwrap(); // 绘制直线 Line::new(Point::new(10, 25), Point::new(118, 25)) .into_styled(line_style) .draw(&mut display).unwrap(); // 绘制圆形 if run_x > 128 { run_x = 0 } run_x+=10; Circle::new(Point::new(run_x, 40), 20) .into_styled(line_style) .draw(&mut display).unwrap(); // 更新显示 display.flush().expect("Failed to flush display"); // 间隔2秒 FreeRtos::delay_ms(2000); } }3.接线 SSD1306SDA -> io05SCL -> io06VCC -> 5vGND -> GND4.效果展示
-
Rust 与 Kotlin:优雅的数据传输与多态序列化实践 在现代软件开发中,尤其是在系统编程和移动应用领域,实现不同语言之间的数据交换至关重要。Rust 和 Kotlin 都以其高性能和安全性著称,提供了强大的多态序列化机制,能够确保数据结构在不同语言间的一致性和可维护性。本文将通过一个示例,展示如何在 Rust 和 Kotlin 中定义和处理多态消息,确保它们之间的无缝互操作。定义消息结构我们希望构建一个多态消息系统,包含两种类型的消息:LedMessage:控制 LED 的整数值。TextMessage:发送一条文本消息。Rust 实现Rust 使用 serde 库进行序列化和反序列化。通过使用 #[serde(tag = "type")] 属性,我们可以根据 type 字段区分不同的消息类型。use serde::{Deserialize, Serialize}; #[derive(Debug, Serialize, Deserialize)] #[serde(tag = "type")] enum Message { #[serde(rename = "led")] Led(LedMessage), #[serde(rename = "text")] Text(TextMessage), #[serde(other)] Unknown, } #[derive(Debug, Serialize, Deserialize)] #[serde(rename_all = "camelCase")] struct LedMessage { value: i32, } #[derive(Debug, Serialize, Deserialize)] #[serde(rename_all = "camelCase")] struct TextMessage { text: String, } impl Message { fn to_json(&self) -> serde_json::Result<String> { serde_json::to_string(self) } fn from_str(src: &str) -> serde_json::Result<Self> { serde_json::from_str(src) } } fn test() { let led_message = Message::Led(LedMessage { value: 33 }); let encoded = led_message.to_json().unwrap(); println!("{}", encoded); match Message::from_str("{\"text\":\"hello text\",\"type\":\"text\"}").unwrap() { Message::Led(led_message) => { println!("收到 LedMessage:{}", led_message.value) } Message::Text(text_message) => { println!("收到 TextMessage:{}", text_message.text) } Message::Unknown => { println!("未知的消息类型") } } }在这个实现中,type 字段用于区分不同的消息类型,serde 会根据该字段自动选择合适的枚举变体进行反序列化。Kotlin 实现Kotlin 使用 kotlinx.serialization 库处理多态序列化。通过自定义序列化器,我们可以根据 type 字段动态选择合适的反序列化器。import kotlinx.serialization.* import kotlinx.serialization.json.* object MessageSerializer : JsonContentPolymorphicSerializer<Message>(Message::class) { override fun selectDeserializer(element: JsonElement): DeserializationStrategy<Message> { val type = element.jsonObject["type"]!!.jsonPrimitive.content return when (type) { "led" -> Message.LedMessage.serializer() "text" -> Message.TextMessage.serializer() else -> throw SerializationException("未知类型:$type") } } } @Serializable(with = MessageSerializer::class) sealed class Message { abstract val type: String fun toJson(): String { return json.encodeToString(Message.serializer(), this) } companion object { private val json = Json { ignoreUnknownKeys = false encodeDefaults = true } fun fromStr(src: String): Message { return json.decodeFromString<Message>(src) } } @Serializable data class LedMessage(val value: Int, override val type: String = "led") : Message() @Serializable data class TextMessage(val text: String, override val type: String = "text") : Message() }在这个实现中,MessageSerializer 会根据 JSON 中的 type 字段动态选择合适的反序列化器,从而实现多态反序列化。Rust 与 Kotlin 的互操作性为了实现 Rust 与 Kotlin 之间的无缝通信,我们可以在 Rust 中将 Message 枚举序列化为 JSON,然后在 Kotlin 中反序列化,或者反向操作。Rust 到 JSONlet led_message = Message::Led(LedMessage { value: 33 }); let json = led_message.to_json().unwrap(); println!("{}", json);输出:{"type":"led","value":33}Kotlin 从 JSONval json = """{"type":"led","value":33}""" val message = Message.fromStr(json) println(message)输出:LedMessage(value=33, type=led)通过这种方式,Rust 和 Kotlin 可以共享相同的数据结构,确保数据的一致性和类型安全。总结通过利用 Rust 的 serde 和 Kotlin 的 kotlinx.serialization,我们可以实现优雅且高效的多态序列化。这种方式不仅确保了类型安全,还促进了不同语言之间的平滑数据交换。采用这些序列化技术,可以增强应用程序的互操作性,使其更加健壮和可维护。
-
安卓使用rust构建so 1. 下载和配置 NDK首先,从 Android NDK 下载页面 下载并安装最新版本的 Android NDK。在安装完成后,确保能够找到 NDK 的安装路径并配置工具链。您将使用这个工具链来交叉编译 Rust 代码为 Android 的本地库。2. 创建 Rust 库项目使用以下命令在命令行中创建一个新的 Rust 库项目:cargo new android_test_lib --lib此命令会生成一个新的 Rust 项目目录 android_test_lib,并包含一个简单的库文件结构。3. 配置 Cargo.toml编辑项目中的 Cargo.toml 文件,指定该库的构建类型,并添加依赖项:[package] name = "android_lib_test" version = "0.1.0" edition = "2021" [lib] crate-type = ["cdylib"] [dependencies] jni = "0.21.1"解释:[lib] 中的 crate-type = ["cdylib"] 指定 Rust 将构建一个 C 兼容的动态库,以便 Android 使用。jni = "0.21.1" 是用于与 Java 进行交互的 JNI 库,允许我们在 Rust 中调用 JNI 方法。4. 配置 .cargo/config.toml在项目根目录下创建 .cargo 文件夹,并在其中添加 config.toml 文件,配置 Android 的交叉编译工具链:mkdir .cargo touch .cargo/config.toml目录结构编辑 config.toml 文件,指定交叉编译时使用的工具链路径:[target.aarch64-linux-android] linker = "D:/android-ndk-r27c/toolchains/llvm/prebuilt/windows-x86_64/bin/aarch64-linux-android21-clang.cmd" # 注意文件路径解释:这里的 linker 配置项指定了 Android NDK 中 clang 编译器的位置,您需要根据自己的实际路径进行修改。5. 添加目标平台支持在命令行中运行以下命令,确保您的 Rust 环境支持目标架构:rustup target list如果 aarch64-linux-android 目标没有显示为已安装,使用以下命令安装:rustup target add aarch64-linux-android6. 编写 Rust 代码编辑 src/lib.rs 文件,编写您的 Rust 代码并实现 JNI 接口:use jni::JNIEnv; use jni::objects::{JClass, JString}; use jni::sys::jstring; #[no_mangle] pub extern "system" fn Java_com_suxii_myapplicationrust_Hello_say( mut env: JNIEnv, class: JClass, input: JString, ) -> jstring { let world: String = env.get_string(&input).expect("invalid pattern string").into(); let output = env.new_string(format!("Hello, {}! this is rust", world)).expect("Couldn't create java string!"); output.into_raw() }解释:#[no_mangle]:防止 Rust 编译器对函数名进行修改,以保证 JNI 函数名称与 Java 端的声明一致。extern "system" fn Java_com_suxii_myapplicationrust_Hello_say:JNI 函数,名称必须符合 Java_包名_类名_方法名 的格式。env.get_string(&input).expect("invalid pattern string").into();:将 Java 字符串转换为 Rust 字符串。env.new_string(format!("Hello, {}! this is rust", world)):创建一个新的 Java 字符串并返回给 Java。7. 编译 Rust 库使用以下命令为 Android 构建 release 版本的动态库:cargo build --target aarch64-linux-android --release编译完成后,生成的 libandroid_lib_test.so 文件位于 target/aarch64-linux-android/release/ 目录下。8. 配置 Android 项目打开 Android 项目的 app/build.gradle 文件,在 android 块下添加对本地库的支持:android { sourceSets { main { jniLibs.srcDirs = ['src/main/jniLibs'] } } packagingOptions { jniLibs { useLegacyPackaging = true } } splits { abi { enable true reset() include 'arm64-v8a' universalApk true } } }解释:jniLibs.srcDirs = ['src/main/jniLibs']:指定 Android 项目中用于存放本地库 .so 文件的目录。useLegacyPackaging = true:使用传统的 JNI 库打包方式。splits.abi { enable true; include 'arm64-v8a'; }:为 arm64-v8a 架构构建 APK。接下来,在 src/main/ 目录下创建 jniLibs/arm64-v8a/ 目录,并将生成的 libandroid_lib_test.so 文件放入其中。目录结构为:9. 创建 Java 接口在 Android 项目中创建一个新的 Hello 类来调用 Rust 编写的本地方法:public class Hello { static { System.loadLibrary("android_lib_test"); } public native String say(String str); }解释:System.loadLibrary("android_lib_test");:加载 Rust 编写的本地库。public native String say(String str);:声明本地方法 say,该方法接收一个字符串参数并返回一个字符串。10. 调用 Rust 函数在 Java 中,创建 Hello 类的实例并调用 say 方法:Hello hello = new Hello(); String message = hello.say("World"); Toast.makeText(context, message, Toast.LENGTH_SHORT).show();解释:Hello hello = new Hello();:创建 Hello 类的实例。String message = hello.say("World");:调用本地方法 say,并传入字符串 "World",获取返回的字符串。Toast.makeText(context, message, Toast.LENGTH_SHORT).show();:将返回的消息显示在 Android 的 Toast 中。
-
esp32c3自动配网 在 esp32-c3 rust使用docker编译 新建项目的基础上,引入必要的依赖Cargo.toml[dependencies] log = { version = "0.4", default-features = false } esp-idf-svc = { version = "0.49", default-features = false } # 添加http的依赖 anyhow = "=1.0.86" embedded-svc = "=0.28.0" # json处理 serde = { version = "1.0", features = ["derive"] } # 序列化,支持多种,xml,json等 serde_json = "1.0" # 专门处理json格式 新建一个跟main.rs同级的配网文件,auto_set_wifi.rs然后在main.rs文件中引用mod auto_set_wifi;编写自动配网rust代码 // 引入配网页面的html文件 static INDEX_HTML: &str = include_str!("../index.html"); // 设置nvs存储的参数 static WIFI_INFO_KEY: &str = "WIFI_INFO"; static NAME_SPACE: &str = "ESP_WIFI"; // 默认ap模式下的配置信息 static AP_WIFO_INFO: WifiInfo<'static> = WifiInfo { ssid: "esp32_c3_wifi", password: "00000000", }; #[derive(Debug, Deserialize, Serialize)] struct WifiInfo<'a> { ssid: &'a str, password: &'a str, } pub fn start_auto_wifi() -> anyhow::Result<()> { // 自动配网,需要先开启ap模式,让手机连上esp32的热点 let peripherals = Peripherals::take()?; let sysloop = EspEventLoop::take()?; let nvs = EspDefaultNvsPartition::take()?; let mut wifi = BlockingWifi::wrap( EspWifi::new(peripherals.modem, sysloop.clone(), Some(nvs.clone()))?, sysloop.clone(), )?; wifi.set_configuration(&esp_idf_svc::wifi::Configuration::AccessPoint( AccessPointConfiguration { ssid: AP_WIFO_INFO.ssid.try_into().unwrap(), password: AP_WIFO_INFO.password.try_into().unwrap(), auth_method: esp_idf_svc::wifi::AuthMethod::WPA2Personal, ..Default::default() }, ))?; // 由于wifi,跟nvs在后面的函数也需要被调用,所有权不能丢弃,需要用安全的智能指针进行接管 let wifi = Arc::new(Mutex::new(wifi)); let nvs = Arc::new(Mutex::new(EspNvs::new(nvs, NAME_SPACE, true)?)); let temp_wifi = wifi.clone(); let temp_nvs = nvs.clone(); let mut buf = [0;128]; log::warn!("正在查找是否存在配网信息..."); if let Err(_) = nvs.lock().unwrap().get_raw(WIFI_INFO_KEY, &mut buf) { log::info!("不存在配网信息,开启ap模式"); let mut temp_wifi = temp_wifi.lock().unwrap(); temp_wifi.start()?; log::info!("开启wifi"); temp_wifi.wait_netif_up()?; log::info!("等待底层网络分配"); log::info!("WiFi信息为:{:?}", temp_wifi.wifi().ap_netif().get_ip_info()); } else { log::info!("存在配网信息,开启混合模式"); let _ = std::thread::spawn(|| start_muxt_mode(temp_wifi, temp_nvs)); } // 配网页面路由 let temp_nvs = nvs.clone(); let mut server = EspHttpServer::new(&ServerConfig::default())?; server.fn_handler("/", esp_idf_svc::http::Method::Get, |request| { request .into_ok_response() .unwrap() .write_all(INDEX_HTML.as_bytes()) })?; // 提交配网的表单信息 server.fn_handler( "/wifi", esp_idf_svc::http::Method::Post, move |mut request| { let len = request.content_len().unwrap() as usize; let mut buf = vec![0; len]; request.read_exact(&mut buf).unwrap(); let temp_nvs = temp_nvs.clone(); let mut response = request.into_ok_response().unwrap(); let raw = temp_nvs.lock().unwrap().set_raw(WIFI_INFO_KEY, &buf); if let true = raw.unwrap_or(false) { response.write_all(b"{\"msg\":\"success\"}").unwrap(); } else { response.write_all(b"{\"msg\":\"faiture\"}").unwrap(); } response.flush().unwrap(); Ok(()) }, )?; // 查看nvs里保存的配网信息 let temp_nvs = nvs.clone(); server.fn_handler("/nvs", esp_idf_svc::http::Method::Get, move |request| { let temp_nvs = temp_nvs.clone(); let mut buf = [0; 128]; let mut response = request.into_ok_response().unwrap(); if let Option::None = temp_nvs .lock() .unwrap() .get_raw(WIFI_INFO_KEY, &mut buf) .unwrap_or(Option::None) { response.write_all(b"{\"msg\":\"faiure\"}").unwrap(); } else { let end = buf.iter().position(|&x| x == 0).unwrap_or(buf.len()); let res = String::from_utf8_lossy(&buf[..end]); let wifi_info = serde_json::from_slice::<WifiInfo>(&buf[..end]).unwrap(); log::error!("WiFi信息为:{:?}", wifi_info); response.write_all(res.as_bytes()).unwrap(); } response.flush() })?; // 开启混合模式路由 let temp_wifi = wifi.clone(); let temp_nvs = nvs.clone(); server.fn_handler("/muxt", esp_idf_svc::http::Method::Get, move |request| { request.into_ok_response().unwrap().write(b"okk").unwrap(); let (temp_wifi, temp_nvs) = (temp_wifi.clone(), temp_nvs.clone()); let _ = std::thread::spawn(|| start_muxt_mode(temp_wifi, temp_nvs)); Ok(()) })?; // 删除nvs的配置信息 let temp_nvs = nvs.clone(); server.fn_handler("/del", esp_idf_svc::http::Method::Get, move |request| { let mut response = request.into_ok_response().unwrap(); let mut temp_nvs = temp_nvs.lock().unwrap(); if let Err(e) = temp_nvs.remove(WIFI_INFO_KEY) { response.write_all(format!("delete faiure,{e}").as_bytes()) }else{ response.write_all(b"delete success") } })?; forget(server); forget(wifi); Ok(()) } pub fn start_muxt_mode( wifi: Arc<Mutex<BlockingWifi<EspWifi>>>, nvs: Arc<Mutex<EspNvs<NvsDefault>>> )-> anyhow::Result<()> { // 启动混合模式 log::info!("延迟500毫秒执行"); FreeRtos::delay_ms(500); log::info!("开始配置"); let mut wifi = wifi.lock().unwrap(); let nvs = nvs.lock().unwrap(); // 重试连接的次数 let mut retry = 5; loop { if retry < 0 { log::error!("尝试剩余{retry}次后,连接失败"); break; } if wifi.is_started()? { if let Err(_) = wifi.stop() { log::error!("断开wifi连接失败,剩余{}次重试",retry); retry-=1; continue; } log::info!("断开wifi"); } let mut buf = [0; 128]; if let Option::None = nvs.get_raw(WIFI_INFO_KEY, &mut buf).unwrap_or(Option::None) { log::error!("获取WiFi信息失败,剩余{}次重试",retry); } let end = buf.iter().position(|&x| x == 0).unwrap_or(buf.len()); let wifi_info = serde_json::from_slice::<WifiInfo>(&buf[..end]).unwrap(); log::warn!("WiFi信息为:{:?}", wifi_info); let client_config = ClientConfiguration { ssid: wifi_info.ssid.try_into().unwrap(), password: wifi_info.password.try_into().unwrap(), ..Default::default() }; let ap_config = AccessPointConfiguration { ssid: AP_WIFO_INFO.ssid.try_into().unwrap(), password: AP_WIFO_INFO.password.try_into().unwrap(), auth_method: esp_idf_svc::wifi::AuthMethod::WPA2Personal, ..Default::default() }; wifi.set_configuration(&esp_idf_svc::wifi::Configuration::Mixed( client_config, ap_config, ))?; log::info!("启动wifi"); wifi.start()?; log::info!("等待网络连接"); if let Err(e) = wifi.connect() { log::error!("连接失败:{e},剩余{}次连接尝试", retry); retry -= 1; continue; } log::info!("等待底层网络驱动处理"); if let Err(e) = wifi.wait_netif_up() { log::error!("等待底层网络驱动处理失败,{e},剩余{}次重试",retry); } break; } log::info!("Ap模式信息为:{:?}", wifi.wifi().ap_netif().get_ip_info()); log::info!("Ip信息为:{:?}", wifi.wifi().sta_netif().get_ip_info()); Ok(()) } 在main.rs中调用fn main() { // It is necessary to call this function once. Otherwise some patches to the runtime // implemented by esp-idf-sys might not link properly. See https://github.com/esp-rs/esp-idf-template/issues/71 esp_idf_svc::sys::link_patches(); // Bind the log crate to the ESP Logging facilities esp_idf_svc::log::EspLogger::initialize_default(); start_auto_wifi().unwrap(); }配网的html页面代码<!DOCTYPE html> <html lang="zh-CN"> <head> <meta charset="UTF-8"> <meta name="viewport" content="width=device-width, initial-scale=1.0"> <title>esp32配网页面</title> <style> body { font-family: Arial, sans-serif; display: flex; justify-content: center; align-items: center; height: 100vh; margin: 0; background-color: #f4f4f9; } .login-container { width: 300px; padding: 20px; background-color: #fff; box-shadow: 0 0 10px rgba(0, 0, 0, 0.1); border-radius: 8px; } .login-container h2 { text-align: center; margin-bottom: 20px; color: #333; } .login-container input { width: 100%; padding: 10px; margin: 10px 0; border: 1px solid #ccc; border-radius: 4px; box-sizing: border-box; } .login-container button { width: 100%; padding: 10px; background-color: #4CAF50; border: none; color: #fff; border-radius: 4px; cursor: pointer; font-size: 16px; } .login-container button:hover { background-color: #45a049; } </style> </head> <body> <div class="login-container"> <h2>配网页面</h2> <form id="loginForm"> <input type="text" id="username" placeholder="ssid" required> <input type="password" id="password" placeholder="密码" required> <button type="button" onclick="submitForm()">提交</button> </form> </div> <script> function submitForm() { const ssid = document.getElementById('username').value; const password = document.getElementById('password').value; fetch(window.location.origin + '/wifi', { method: 'POST', headers: { 'Content-Type': 'application/json' }, body: JSON.stringify({ ssid, password }) }) .then(response => response.json()) .then(data => { // 在此处理响应数据 alert(data.msg); if (data.msg === "success"){ fetch(window.location.origin + '/muxt'); } console.log('成功:', data); }) .catch(error => { console.error('错误:', error); }); } </script> </body> </html>